Robert.G
January 2019 edited January 2019 in Miscellaneous Builds
Or ‘Château d’eau’ as it is called in the language of Molière. A structure I still had to build for my layout (1/43,5)
This is a complete scratch build edifice which I want to share with you guys her on the forum. ( By kind permission )
There are no SW kits involved, but perhaps these simple techniques might help you with diorama building .
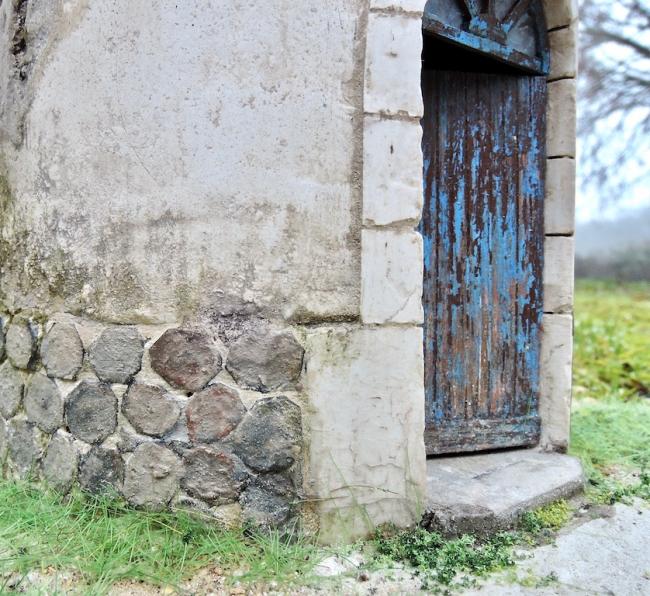
Al materials are, cardboard, plaster, cement, tin can, white glue, 600 grid water sandpaper and some left over brass rod. The peeled paint door is done with the hairspray technique, twice with two colors, over stained wood.
First the finished ‘product’.
If you have specific questions, fire away.
Here we go.


Thanks for watching
Robert
Comments
EricMG
January 2019
This is too good. I’m quitting modeling and going back to sex and drinking!
vietnamseabee
January 2019
Ok Robert…the first pix are nice of the prototype…now show us the model ;-))
Simply astounding ..well done
Terry
EricMG
January 2019
I have to know this hairspray tech for the door. The water tower is very poetic, very beauty, better than reality!
EricMG
January 2019
Why does the light bulb look real?
vietnamseabee
January 2019 edited January 2019
MG…Robert has posted some of his other work in the past and it’s equally impressive…a brick wall and a loading platform as I recall
Robert.G
January 2019 edited January 2019
The lamp fixture is made of brass washers, a micro led is glued in it and on that micro led, a piece of translucent fiber which was filed round, was glued aswel . The s-shape hook that goes into the wall are simply the two very thin wires which I bend and hardened with superglue. It’s all in the proportions you know. ( Yes I know you know…: ![]() )
)
Hairspray technique: first stain your wood, ( like in the manuals ![]() ) then a coat of cheap sticky hairspray, then a coat of acryl paint. When this is dry, but not hard ,moisten it with water ,take a tooth pick, stiff brush and start gently scratching the surface until you like the look. I did this twice. (after the first layer session was completely dry and hard.
) then a coat of cheap sticky hairspray, then a coat of acryl paint. When this is dry, but not hard ,moisten it with water ,take a tooth pick, stiff brush and start gently scratching the surface until you like the look. I did this twice. (after the first layer session was completely dry and hard.
ironmountainlumber
January 2019
Hi Robert,
This is fantastic. Your building is truly art. I am glad you are sharing how you do this.
Again at first I looked at the pictures at the top of the thread. I didn’t realize this wasn’t the real tower. How did you color the metal tank ? It looks great as well as everything else.
Jim
brownbr
January 2019
That’s one to be proud of for sure.
Joel
January 2019
Another jaw dropping model. Thank you so much for sharing.
sdrees
January 2019
Hi Robert,
I can’t believe that this is a model. The work is just awesome!!!
KKarns
January 2019
Beautifully done…love the masonary work…can’t wait to see the prototype.
kebmo
January 2019
what steve said.
holy mackerel…
KCSTrains
January 2019
Very nicely done. You are truly a master craftsman with a very creative mind. Phil
MitchN
January 2019
Robert,
I continue to be amazed by your art. Your modeling is what I strive for and I always fall short.
Wonderful photography again, as usual.
The only thing that gives away the illusion of a real water tower is the color of the model grass. Otherwise it IS the prototype.
Mitch
Karl.A
January 2019
Thanks so much for the wonderful tutorial Robert and showing us the steps for your incredible work. A true master craftsman on display.
Fantastic modeling.
Karl.A
Robert.G
January 2019
Thank you guys.!
MitchN
January 2019
Robert,
Could you describe the paint and finishing technique you used on the water tower pipes?
Thanks
Mitch
Robert.G
January 2019
Mitch, all metal ( brass) parts, pipes, valve, ladder, were chemically blackened.

Then I used AK interactive rust colored pigments mixed with very diluted flat varnish as a binder. Al this is in very small quantities. This gives a texture. When all is dry again with some rust colored chalks. ( as in the manuals)
The reservoir, being covered with sanding paper ( 600 grid) was first sprayed ( airbrush) with black primer on a cellulose base. ( I just have lots of it and gives a strong base for further weathering ) Pigments, diluted oils, ( the rust and chalk from the water) . I finished with some hairspray which made it at some parts just a little bit shinier like as if the metal panels weren’t all rusted. Could have used satin varnish, but the hairspray was at hand from the door paint/crackle job.
Does this help you a bit ?
MitchN
January 2019
Thanks Robert!
Mitch
Dave_S
January 2019 edited January 2019
Robert,
Could you share a straight on, close up photo of the door? It is a rather unique looking door and transom. Is it a copy of an actual door from a photo or something from your imagination?
Thanks, Dave S. Tucson, AZ
Robert.G
January 2019
Hi Dave, this door just came from my imagination, but similar ones can be seen here (French countryside where I live ) all around. In the old farmhouses, people seem to spend rather on wine than on paint… ![]()
As you can see, and which is logical, there is more paint gone towards the bottom and the transversal plank below because these are the parts more exposed to rain.


The door handle came from a German company Addie Model

Hope this helps you along.
Robert
Robert.G
January 2019
Here are some more examples of doors and windows in the same manner . These are modeled after the originals at my old farm barn.


All done with the hairspray technique. Could have been the AK chipping fluid as well , but the ’ Modus Operandi ’ is the same..
patrick
June 2020
Vraiment superbe!
TomH
June 2020
Amazing work Robert! Thank you for sharing.