This thread was started in February, 2019
Joel
February 2019 in O Scale Builds
Hi All, in anticipation of the imminent release of Rail Road Camp part 2 I have decided to start part 1. No way I will finish it before part 2 arrives and I move on but hopefully I can get some of the main structure done and then when I finish part two I’ll combine them and do the final details.
There have been other great builds of this amazing kit so I’ll try and just comment on the things I plan on doing a bit differently.
Very excited to delve into a “new” SW kit. The smell of urethane is calling to me.

Comments
brownbr
February 2019
So are you planning on saving space for part 3? I’ve been thinking about ordering another part 1 with the intention of having a BIG dio with all 3 parts.
kebmo
February 2019
this sits on my shelf while i await part 2 and work on finishing up o’neill’s. as far as i’m concerned, the timing of this build is perfect. i’m looking forward to following along. i’m planning on doing a joint build of this kit with engine909 (or maybe the one after 909:)) once i wrap up o’neill’s,
vietnamseabee
February 2019
I’ll be following along with great interest…the HO version (which I’m still working on) is a great kit…anxious to see how you guys do things…things I’ll probably say “why didn’t I do it that way”…carry on
Terry
KKarns
February 2019
With much anticipation I wait to see what you do with this great kit series Joel.
Robert.G
February 2019
So am I Joel .! I have this kit on the to do list as well.
Jerry
February 2019
Joel looking forward to you starting this kit.
Jerry
Joel
February 2019
Well we are off and running. Cleaned up the minimal amount of parting lines on the castings and sprayed the resin ones and blackened the metal. Also started putting the stone walls together and priming. Lots of busy work to start but tomorrow I can move on to distressing some wood.


admin
February 2019
Excited to see what you do with this kit Joel! Off and running…
Wes
February 2019
Keen to see this unfold. I loved building this kit.
Karl.A
February 2019
Looking forward to another one of your great builds Joel. A fantastic kit for us all to enjoy watching you build.
Karl.A
KKarns
February 2019
Love seeing a SWSM kit getting started…and in the hands of Joel no less!
Joel
February 2019
Spent the day distressing and staining the wood for the siding and window frames.
Typical wire brush and file card to distress. To colour I tried something new. First I dry brushed the wood with white craft paint. Really wiped off the paint and then scrubbed it onto the boards 3-4 at a time. Can hardly see any white on them.

I then painted on dark brown/grey acrylic and quickly wiped off the board (one at a time). The dark colour picks up the white and becomes much lighter on the raised surfaces and the dark colour is pushed into the grain. You get a different effect if you wipe with paper towel, cotton cloth or finger tips. I find the best effect was with fingers.

The picture is a bit dark but it looks good in person. Now I can add a little chalk to give some more variations in colour.
Because this is untried I weather both sides of the strip wood so I get more choices in the next step when I glue on the siding. I search through the entire pile and pick out all the really good boards which I will use for the front and left side. As opposed to the directions I will start with the important walls and use all the great wood there and then move on to the less important walls and use up the left over wood.
Dave_S
February 2019
Joel,
Along with a few other SWSM O-Scale modelers, I have this kit waiting for the arrival of the RR Camp Truck Repair Shop kit, Part 2 of this group of 3 structures. I have even picked up a few truck kits to include in a future diorama. I’ll be following your build of this kit closely as I am a fan of your builds.
Later, Dave S. Tucson, AZ
kebmo
February 2019
i echo what dave said exactly.
vietnamseabee
February 2019
I typically have stained (CA) as well , however I’m finding there are times ( when the roof is removable) that I want the interior of the boards stained differently because the interior and exterior will not weather the same…not sure how to accomplish that as staining with chalk/alcohol is rather messy and both sides get covered during the first staining…any thoughts?
Terry
Karl.A
February 2019 edited February 2019
Perhaps you could show us an example of where youve done this Ed as I find the pens too dark, uncontrollable and monotone.
Terry, Ive successfully done CA in different colours on each side of boards for the effect you describe.
5 boards at a time, keep them tight together, stain the lighter colour first. once stained lift the boards straight up so that the under side doesn’t get in the mess. wipe the working area clean, repeat for all boards. Once dry do exactly the same for the otherside of the boards in the darker colour.
It takes a little longer but isn’t really hard or a big deal.
My locoshop is grey on the outside and brown on the inside, all done with CA washes/colouring, which is similar to what you want, I’ve also done it on a few other builds, no problems.
Karl.A
vietnamseabee
February 2019
Thanks Ed and Karl…I also wondered about laying the strip wood on blue painters tape, staining one side, letting dry and lifting off…repeating process for other side…all 3 methods are tedious and time consuming but time vs effect is a worthy trade off on a SWSM kit
Terry
vietnamseabee
February 2019 edited February 2019
Joel…sorry, it appears I’m highjacking your thread…maybe if Karl or Brett can move my comments about staining over to the Technique subject
Terry
Joel
February 2019
Don’t worry about it Terry as long as it’s modelling related I don’t mind people chiming in. I agree with Karl it is not too hard to do, I did it on the welding shop part of ONeils. I found I got less bleed to the under surface if I didn’t work on glass - typically I use MDF or some absorbent wood so if some leaks between the boards it doesn’t wreck the other side.
Joel
February 2019
Started putting done the siding. I followed the directions at first but then I realized instead of cutting the siding after it is all laid down it might make more sense to finish each piece of siding and glue it to the wall using a small spacer to make sure the overhang is always exactly 1/16". Worked like a charm.

You can see the colouring of the boards better in these photos too.
And now the complete first wall (before detailing)

KKarns
February 2019
Ahh…my favorite part of a build. Wood looks wonderful Joel with great natural variety in color tones.
Dave_S
February 2019
Joel,
Some good tips in today’s postings.
Interesting to see how the coloring of the same clapboards changes a bit from photo to photo. I think it just shows that often times we get a bit tense when we post photos that don’t match what we see from the naked eye to the camera photo. To many variables among focal length, light, aperture and lens speed to wig out.
Later, Dave S. Tucson, AZ
Robert.G
February 2019
Very nice wall with natural color tones. What ever the technique you use, it’s the result that counts.
brownbr
February 2019
your technique produced a very nice set of colors on the wood. Great looking wall.
Jerry
February 2019
Joel that came out perfect nice variation.
Jerry
kebmo
February 2019
karl,
please explain what you mean when you refer to CA.
Joel
February 2019
I believe CA is Chalk/alcohol vs AI which is alcohol and ink
Karl.A
February 2019
Chalk/Alcohol
Karl.A
February 2019
Sorry Joel. I hadn’t seen your reply when I posted my duplicate.
kebmo
February 2019
[forehead smack!] thanks.
Joel
February 2019
Finished the right wall. Added nail holes with a pin and then couldn’t see them so I went back and using A/I and C/A and a 10/0 brush I dabbed a bit on each hole.

Now on to windows. I don’t usually promote stuff here but I love this tool from MK or Micromark. Great little saw and it fits in the slots in the kits templates/jigs. So instead of having a too smooth knife cut I get a slightly roughed up but square cut. Minimal need for the tru sander or distressing afterwards.

I deviated from the manual again by building each window on the template and then I’ll pick the best to go on the front wall. Still needs some details but getting there.


prsdgt65
February 2019
Crazy good!!!
Frank
brownbr
February 2019
I’ve been debating getting that tool. You just convinced me.
KKarns
February 2019
Nail holes are perfectly done Joel. Subtile as they should be but make such a nice look and once again, wonderful wood work.
Joel
February 2019
Almost finished one wall - added the windows. Just the bottom sashes and the shades to go.

vietnamseabee
February 2019
Nice color variation
Terry
sdrees
February 2019
The texture and color are just amazing Joel.
PaulS
February 2019
sdrees said:
The texture and color are just amazing Joel.
Yes Joel, tons of character in that wall. Looking forward to seeing this develop.
–Paul
brownbr
February 2019
You sure nailed the aged wood look on this wall
CarlLaskey
February 2019
Joel. That has got to be the best weathering that I have ever seen. …Carl…
Robert.G
February 2019
Very well done that wall ! !
Dave_S
February 2019
Joel,
This photo shows off your weathering to great effect. What a “wow factor” for this structure. Can’t think of anything to add that hasn’t already been said by Ken, Ed, Terry, Steve, Paul, Bryan, Carl and Robert.
Later, Dave S Tucson, AZ
Joel
February 2019
Thanks Ken, Terry, Ed, Steve, Paul, Bryan, Carl, Robert and Dave. I just made up the technique last week and this was my first try (yes I experimented with an expensive kit). Carl you’re a bit over the top but I do appreciate the hyperbole.
I’ve decided to start a bit of work on the stone wall (my favourite part) and then get back to finishing up the rest of the walls and windows.
Hopefully pictures later today
Jerry
February 2019
kebmo said:
karl,
please explain what you mean when you refer to CA.
Chalk and Alcohol. An not the kind you drink use the cheap stuff!!
Jerry
KKarns
February 2019
Way to start a build Joel!..that wall has set the character of the entire build. Love what you have achieved here.
admin
February 2019
Love it - going to look so good above the first floor stonework!
Joel
February 2019
hey Ken thanks I agree in this model the character of the wood work is paramount and the contrast of the various ages of wood on the different structures. To offset both Brett brings up the amazing interlocking castings that make up the lower level. Sadly much of it is hidden by adjoining structures but it is fantastic.
Here’s my first pass at the front wall.

Since building my first O scale kit (The Rigging Shed) I have always loved the way you can actually build a door stick by stick. That shed is still one of my favourite models. I thought I’d try and do the same here using the laserboard provided as a base and using the scrap wood from the siding to overlay. Still needs some hinges and a knob but it should pass.
Jerry
February 2019
Nice. A great looking door!
Jerry
Dave_S
February 2019
Joel,
Nice to see how each piece of the final puzzle is shaping up piece by piece, segment by segment. Always looking forward to more progress posts as pieces of the puzzle are added along with photos.
Will you try to match the door weathering to the siding weathering or do you have something else in mind.
Later, Dave S. Tucson, AZ
kebmo
February 2019
yeah, it sure is. so far everything looks fantastic. i’m almost finished with o’neill’s (didn’t you start yours after me?) and i have this on deck. i love what you did with the siding. i’ll probably do my 2nd floor siding with a trace of red in it. at least that’s what i think now…
i can hardly wait to get to those stone walls…
and engine909 (not the one after 909) sad we’re going to do joint build, so t hat should be fun.
brownbr
February 2019
Stonework look great after only the first pass
Robert.G
February 2019
I was going to say the same thing. Great work.
Joel
February 2019 edited February 2019
Dave I’m considering a peeling paint effect for the door but I kinda like it as it is.
I did indeed start after you but I didn’t have a flood and other major issues to deal with.
Thanks Bryan and Robert. I’d like to add a bit of slimy green to some of the lower stones and maybe darken the grout in some parts for more contrast.
Office walls are done.

Now just the glue up. Experimenting with colouring the siding on the warehouse. Then I can start that structure.
KKarns
February 2019
Love it Joel! Stonework looks like stonework! Great window detail. Really like the window frame finish you achieved, contrasts nicely with the casings and the blinds are a great touch.
prsdgt65
February 2019
Love the coloring of the wood.
Frank
Joel
March 2019
Thanks Ken, Frank and Ed. I really do like to share what I’m building it may not be for everyone but I know that I’ve learned a ton of great techniques on this web site and I’m glad to experiment and pass on what might work for me.
The clapboard part of the office is mostly done now so I’m staging it here:

Now on to the Warehouse.
SteveCuster
March 2019
That’s some of the best wood coloring I’ve seen Joel. Great job!
Dave_S
March 2019
Joel,
One sweet build to date. I’m learning a lot from your explanations and photos.
The windows on the second story clapboard section of the Office are executed exceptionally well.
I would have to guess that the SierraWest O-Scalers among us are all anxiously awaiting the release of the Truck Repair Shop.
Later, Dave S. Tucson, AZ
CarlLaskey
March 2019
Joel. It is not the best that I ever seen but nothing compares to it, Is that better.
I am going to build the machine shop next and make it into a box and stave factory and want to get the same look that you have…Carl…
TomMich
March 2019
Love the look of the wood! Great weathering too. The trim on your windows are so precise. Nice work!
David_C
March 2019
Excellent work on the window frames, looks more professional. Nothing wrong with the original version, but it does make a difference. I’m going to look into that tool too. Can’t have enough tools, I keep getting more.
Joel
March 2019
Thanks so much guys. Quite a simple technique and no fumes. A bit cartoony but that’s what I like.
I tried the same on the warehouse, this time using black instead of dark brown, but it was too stark and not bleached out enough - like Karl I wanted a much older warehouse.

So I lightly streaked the wall with light grey and tan chalk. Just touching the raised areas.

Then I take a soft brush and dip it in alcohol and remove most of it and brush with the grain. Blends everything and gives it that dusty old look but you can still see the grain and distress marks.

Not done yet but way closer.
Dave_S
March 2019
Joel,
Just keeps getting better and better with each new post. As I said earlier, I am learning quite a bit from your posts about some new techniques to attempt. Thanks for the continuing posts and photos.
Later, Dave S. Tucson, AZ
Karl.A
March 2019
looking fantastic Joel. It’s always amazing how versatile these chalks are once you master the basics. Putting your own added touch/methods has led to exceptional results.
Really nice work and colouring.
Karl.A
Joel
March 2019
Thanks Dave and Karl. Still working on the warehouse portion. Finished the windows and installed the door. Still some weathering to go. The door really matches the colour of the siding because I built it up board by board after using the same staining techniques. I wanted a door on a sliding rail and was hoping to do a minimal interior even though this is pretty much a backround building.
Still have to add the fire extinguisher and maybe some signs.

kebmo
March 2019
looks awesome!
KKarns
March 2019
Beautiful wood work Joel. The door turned out really nice. Love the weathering on the door hardware.
brownbr
March 2019
That turned out great.
TomMich
March 2019
Joel,
Love the color and texture of the wood.
Joel
March 2019
an attempt to stage what I have completed to get a sense of it as I work on interior details and signage. I do feel the warehouse calls for some sort of sign. Thoughts?

kebmo
March 2019
i think a faded, painted on (stenciled?) sign like the one on blue sky would be real cool. your wood treatment looks excellent. so do the stone walls. it all looks great.
brownbr
March 2019
Yes. To Kevin’s point, a stenciled sign would look great. I had a stencil made for mine. I’ll post a pic if you like.
CarlLaskey
March 2019
Joel. Put your name on it like [ Joel at his best ]. Carl…
Joel
March 2019
Thanks for the input Ed, Kevin Bryan and Carl. I’d love to see the stencil you had made. Didn’t even know that was a thing. I don’t want to make it too busy because it is part of a greater scene but a faded stencilled sign sounds like a good way to go.
I’d like to hear from the Karl and Brett on this as there might be a very good prototypical or aesthetic reason there was no signage.
brownbr
March 2019
Thanks Joel, didn’t want to hijack your thread.
I have a fellow On30 friend who works for a graphics/printing company. He made the stencils for me. I had this build in mind for the stencil but as you can see, he did a whole sheet for me so I could do rolling stock, etc. I know there are companies out there that will provide this service as well. I’ve gotten plenty of use out of them.
Funny how we see flaws in our older builds now…I see lots of things I would like to have done better or differently in this photo.


KKarns
March 2019
If…you were to use a sign…and if…you were to include it in Railroad Camp…that would be the spot! I would call it “Gallant Industries” ..sorry you can’t use it as I have a copyright on that name that I will be using on a future SWSM build! Love what you’re doing Joel and once again, beautiful woodwork. I like the teaser photo of the splendid interior of the warehouse.
Jerry
March 2019
Looks great Joel. Yes do your name!
Jerry
kebmo
March 2019
i started on mine and i think i kinda screwed the pooch. the manual says to spray paint the scribed clapboard 2nd floor walls flat black on both sides. my black rattle can paint was sputtering, so instead i used a brown paint. the problem is that now i can’t see the scribed lines. what’s the work around?
brownbr
March 2019
Kevin, you could try drybrushing with a tan color to see if the scribe lines pop out.
kebmo
March 2019
thanks bryan, i’ll give that a shot tomorrow.
brownbr
March 2019
engine909 said:
Will Keith Richards outlive a cock roach?
I believe that Keith Richards died of massive organ failure in 1982. What we observe now is his zombified remains.
kebmo
March 2019
i thought he died when he fell out of the palm tree…
kebmo
March 2019
i blush…
Joel
March 2019
Well you go away for a week and you lose total control of your thread. Serves me right for taking a break. Trying some things with the interior of the warehouse. Nothing glued down but I like the arrangement. This is a background structure so I’m not going too crazy.


kebmo
March 2019
that looks great! i guess i better order some extra wood…
sdrees
March 2019
Terrific job Joel!
brownbr
March 2019
I like the idea of a full interior
Joel
March 2019 edited March 2019
Thanks all. Not sure where all the castings came from. A few are SierraWest but most are just from my part box and just not quite good enough for close inspection. The wall and floor are from a clinic I took with Dave Revelia. Again won’t stand up to close inspection but the colouring is good. I didn’t have enough wall or floor so I photocopied both and printed matte pictures and used those in less conspicuous spots. If you look the wall with the door is 3d while the wall behind the workbench is 2D. I will improve this a bit this weekend.
Joel
March 2019
I really liked Bryans stencil idea so I made one. I printed the name on a scrap and covered it with tape. Then I took an hour and carefully cut out the black letters leaving a stencil.

I held it in position and dabbed some ivory paint with a small brush and voila:

Still some weathering to do but much better. Hopefully I can glue the building together and finish the interior this weekend.
admin
March 2019
wall looks awesome. kinda partial to the sign!
prsdgt65
March 2019
Love that wall and sign. Killer job!!!
sdrees
March 2019
I would have put “Joel’s Supply”! Looks good though.
brownbr
March 2019
Stencil turned out great.
kebmo
March 2019
wow!!! that looks outstanding!
Dave_S
March 2019
Joel,
said…“Well you go away for a week and you lose total control of your thread.”
While you took a short break the guys were just trying to keep your topic “active” until you returned.
Thanks for telling us how you chose to execute Bryan’s suggestion of a “stenciled sign.” I now have that idea filed and ready for use on a few builds.
Later, Dave S Tucson, AZ
Joel
March 2019
Did some more weathering on the front of the warehouse. Rust streaks and greenish slime added. Subtle but I do think it improves the look.

Now time to assemble the building.
Jerry
March 2019
Nice job on the coloring Joel. Great effect at the bottom with the green just enough.
Jerry
prsdgt65
March 2019
Joel,
I really like the coloring you have achieved on the wall.
Frank
kebmo
March 2019
very nice!
Joel
March 2019
Thanks Jerry, Ed, Frank and Kevin.
Glued on the front wall and worked a bit on the interior.


The top view shows a bit more where I cheated and used photocopies of floor and walls to fill in. Not quite done but I’m ready to leave this and start on the office roof.
prsdgt65
March 2019
Joel,
Those photocopies look great. Where did you find them?
Frank
Joel
March 2019
Hi Frank. The floor in front of the door next to the work bench is real weathered wood from an old clinic I attended. I didn’t have enough to finish floor so I used a photocopy for the floor under the window which is barely seen. Same with the walls I added some studs over the work bench to give the illusion it is all board on board but its actually a photo with the studs glued on. The wall with the door is real as are a couple of small areas.
TomMich
March 2019
Photo copies are very convincing and great idea.
Joel
March 2019
Ok on to the Office roof. I glued it on, Covered it with transfer tape and trimmed the edges with stripwood. I also added the rafters as I find it easier to do at this point and less likely to damage the shingles.


kebmo
March 2019
it all looks so precise. outstanding job.
sdrees
March 2019
All I can say is WOW!!!
TomMich
March 2019
Great texturing and weathering on the wood.
Joel
March 2019
Thanks guys, so far so good. Now on to shingling. I wanted distressed shingles so against the advice in the manual I tried using a wire brush and all but shredded the shingles. I stained the sheets with CA and love the thin wood and varying thicknesses. I started out using strips of 5-6 shingles but quickly realized that it made the effect a bit blocky so I opted to put in the 2 hrs extra work and cut up the rest of the sheets and mixed them all up in a big pile and started to apply the shingles individually.


kebmo
March 2019
nothing quite like individual shingles. that looks just like my neighbor’s roof.
prsdgt65
March 2019
Joel,
Looking good. I love using that transfer tape for doing the shingles. So much easier than glue.
Frank
Joel
March 2019
Frank, the transfer tape is great but I still put a small dab on the shingle below so each shingle is secured in two places. Probably overkill but it only adds a small amount of time.
brownbr
March 2019
Great coloring on the walls.
TomMich
March 2019
Shingles look GREAT! Well worth the extra time and effort.
Joel
March 2019
Well finished one side of the roof. Thought the colour might be too pale but it turned out like a sunbleached shake roof.

Small but good problem is that I see from the website that the Truck repair Shop is shipping. Hope I can finish all these shingles before it arrives as I plan on switching to that build and then returning to this one.
vietnamseabee
March 2019
A great looking roof by any standard
Terry
PaulS
March 2019
roof looks fantastic Joel, and the coloring is spot on for my eyes with the sun bleached look !!
–Paul
kebmo
March 2019
i’m looking at my neighbor’s roof, then the laptop, then the roof, then the laptop and there is no discernible difference. your coloring is spot on.
prsdgt65
March 2019
Joel,
Roof looks great.
Frank
sdrees
March 2019
shingles look terrific Joel. Color is right on
Robert.G
March 2019
Very much so. Great color. Enough variation within the tones, but. They all blend together. Nice job !
Joel
March 2019
Thanks guys. Took a break from shingling and finished up the doors on the warehouse side wall. I sanded one edge of the door to thin it out so it could open a bit more. The colour matched pretty well.

Jerry
March 2019
Very realistic weathering on the siding and roof. Great job Joel.
Jerry
admin
March 2019
color matches perfectly, excellent!
Joel
April 2019
Done the shingles. Expecting a package any day now but I’ll keep forging ahead until it arrives.

kebmo
April 2019
how did you support the floor in the warehouse?
Joel
April 2019
Kevin I just used some 1/8 square strip wood around the inside of the walls. Really easy.
kebmo
April 2019
easy peasy. thanks!
Joel
April 2019
Ok on to the loading dock. I built the frame as per the instructions although I didn’t need to use the true sander as I used the razor saw to cut each piece. Not sure why but I like diagonal bracing so I stained up an extra piece of 1 X 4 and added some bracing and nail holes. It’s glued to the warehouse now but not the stone foundation. That’s just placed there for now.

kebmo
April 2019
that looks great!
ironmountainlumber
April 2019
The coloring is perfect. Love the Sierrawest stencil. Fantastic modeling.
Jim
Joel
April 2019 edited April 2019
Started the decking- still a ways to go…

Got a bit bored so started the shed. To be different yet again, these are stained with CA over white craft paint. Really pleased with the colour variations. Still have to stain some nail holes and add door hardware. I think I’ll add some knot holes too.

TomMich
April 2019
Your wood colors and textures are really GREAT!
Dave_S
April 2019 edited April 2019
Joel,
Some truly amazing textures and weathering are on display on that shed wall.
Thanks for sharing your ideas and photos. Could you give more specifics on your “CA” over white craft paint technique? What are you using for your “CA” mix? Do you brush on the top coat and wipe it off or is there another technique you use?
Thanks, Dave S Tucson, AZ
Joel
April 2019
Loading dock is finished with nail holes and some shading. Just crying out to be buried under a ton of fantastic Sierrawest castings.


kebmo
April 2019
that looks great. i like the diagonal bracing too, seems more prototypical to me.
brownbr
April 2019
All of your wood has a nice sun-bleached look to it.
Joel
April 2019
Thanks Tom, Kevin, Dave and Bryan. I’m really pleased with this new technique and it’s really simple to do. I use white paint from a tube. The cheap acrylic from Michaels called “basic”. Put a dab on my palette and dip a brush in it then wipe off almost all of it. Then I vigorously rub the wooden boards holding the brush at around a 30 degree angle so as to deposit a white haze on the raised area of the wood. I work on glass and can see the white haze build up on the glass around the strip wood. Since they’ve been textured already the grooves or “grain” gets no white paint. I find if I let this dry for 5-10 minutes I get a better effect. Then I take the normal 308.5 and 308.3 and scrape a couple of piles onto my work surface. I dip a brush in alcohol and then just the tip in one of the piles. Then paint on the CA and immediately pull the strip wood through my fingers to remove most of it and force some down into the grooves. The white lightens up the CA on the surface and the dark colour stains the grain. Only problem I’ve had is that it seems this step has to be done very quickly so I dry brush the white on all the wood and then do the CA on each piece one at a time.
kebmo
April 2019 edited April 2019
i’ll have to try that technique one of these days. results are great. actually it sounds very similar to the damp brushing except there’s a base coat of acrylic white.
Robert.G
April 2019
Joel, the stonework is SO WELL done. As are the bleached boards. Love it so far…
Joel
April 2019
Thanks Robert and Ed. I guess luckily my package with the Repair shop is still in the mail so I have an extra couple of days to get this structure a bit further along. Almost finished the little side shed.


Robert.G
April 2019
This is the first time I hear someone wishing his SW kit won’t be there to soon…
The side shed wall looks fine !
KKarns
April 2019
Catching up here Joel. Outstanding work!..I can “feel” your enthusiasm…your attention to detail just oozes from every aspect of this build. You are bringing a fresh and wonderful perspective to your wood work, it has such a unique and signature look about it…great stuff…Ken
Joel
April 2019
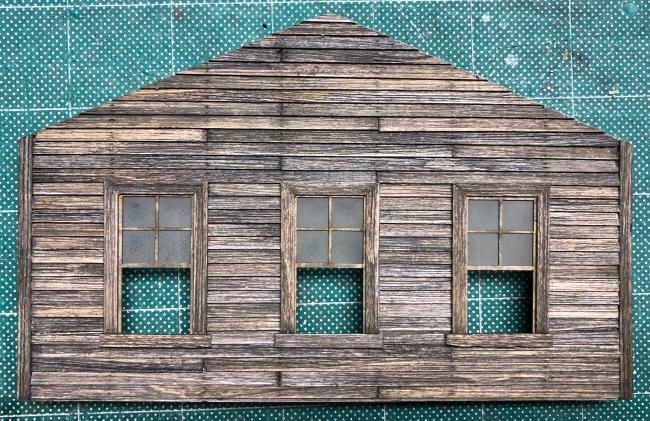
Not sure why I din’t do this for the upper front windows but spent an hour today rebuilding the front windows board by board on the stone wall. Quite pleased with the result.

kebmo
April 2019
outstanding…my jaw’s still on my laptop…
kebmo
April 2019
if my rr-camp turns out half as good as this, i’ll be a happy boy.
Dave_S
April 2019 edited April 2019
Joel,
How did you get those relatively clean spots on the very dirty pieces of the window
glass? Did you use a variation of the “salt” method for bringing out rusty weathering? Great original artistic touch!
Your weathered shed siding is mesmerizing.
Later, Dave S. Tucson, AZ
brownbr
April 2019
You are making us all look bad by building your windows.
Joel
April 2019
Dave I just followed the directions and misted the acetate with dullcote That’s what happened. Cool effect. Making the windows was straight forward, True confessions, I used a template. I took the original lazerboard window and peeled off about half to decrease the thickness then I weathered up some spare HO lumber 2x2 and 2x4 and I glued the pieces to the lazerboard template. I measured each off the template as I was doing it and was careful not to cut right through the template. When dry I turned it over and trimmed off any parts that were extending past the template. Then I peeled off the paper backing and stuck on the acetate. Tah duh. Most of modelling is just putting in the time to do crazy things like this.
Joel
April 2019 edited April 2019
Well the postman arrived and brought a small package so I think this is a great place to put everything on hold for a month or two while I tackle part two. I completed the wiring for the lamps and the roofs so it really is great timing. Still a ton of details to add but at least the structure is pretty solid.
Joel
April 2019


kebmo
April 2019
that looks great! i hope mine looks half as good.
Dave_S
April 2019
Joel,
This has been a great build to follow. I have learned quite a bit reading and studying the accompanying photos.
I can understand your wanting to get to part two of the series, the Truck Repair Shop. I think all of us are excited to see what you do with that kit as you have already begun the preliminary posts at the “Official O Scale Truck Repair Build Thread”. So, for now, we can hit the “pause” button on this build and switch to following the build of the next structure of the Railroad Camp trio.
Later, Dave S Tucson, AZ
TomMich
April 2019
Joel the windows turned out great. I like the texture better than the laser board. In my Morton’s build I tried using an Exacto knife to add texture to the laser board, but it doesn’t show up as well as I liked. I don’t have the patience to build scratch windows in HO scale.
KKarns
April 2019
Simply wonderful work Joel. Such a beautiful grouping of structures and they all blend seamlessly together but yet unique.