this is what i’ve been working on.


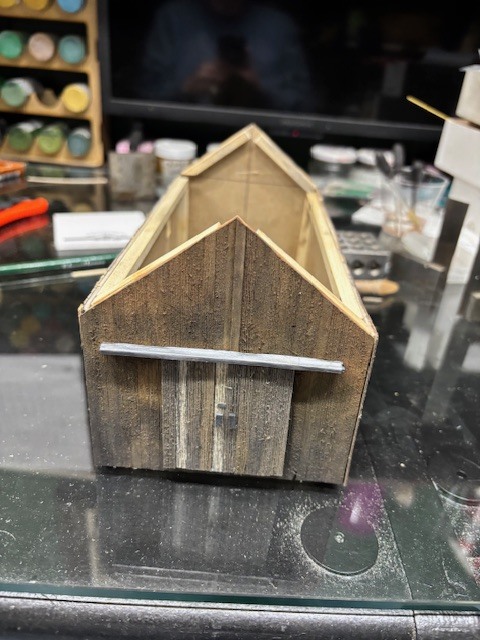


Nice work Kevin. You captured the feel of the building very well.
thanks tom!
this is the next part.
gotta figure out the elevation and how i’m gonna build the stone foundation wall.


Nice Kev…very nice
terry
Nice Kevin! Just need a few scratches where the doors slide over the siding.
i did an AI search looking for a drawing of the water wheel, and look what i found. a 1/4" scale drawing of A waterwheel that happens to be exactly like the water wheel on my mill. i printed it out and used it as a template, and this is where i am so far.
i have no clue how to round the wheel, so i think i’m gonna go with this.

Nice that you found the template the right size. Kevin. My guess is to sand the last boards to round them off. You could also draw the curve on the last board and carefully cut it with an Xacto knife then to smooth them.
tom,
yeah, i reckon if i’m gonna do it, that’s how i’m gonna do it. the jury i still out on it…
guess who seriously underestimated the materials needed? that’d be me. i don’t know what the hell i was thinking. i have to build two sides of this dumb ol’ wheel, and i only ordered enough material for half of one.
what a dumbass.

tom.
part of the problem is the fact that i guessed that the boards between the spokes were 4 x 12s. when i printed the drawing i found that they’re actually 4 x 18’s so none of the geometry worked out as far the inner boards go. i also guessed on the spokes, i used 6 x 12s. i have no idea if that’s correct or not. unfortunately i can’t go crawling around the prototype cuz the wheel isn’t accessible at all. that’s probably a good thing. i have an appointment to meet with the custodian of the historical society tomorrow (the only day it’s open) to see if she’s got any archival stuff i can see.
wish me luck.
You weren’t underestimating. You were just using one side to build a “proof of concept” or to work out the details before committing to the total expenditure! Am I right?!
nah, i just underestimated.
Don’t beat yourself up Kev. What you have done looks very nice. No one will know the board sizes are different. People will just look at what a fine model you have built!
Take a deep breath…re-group…and move on It’s looking good bro
Use the closed cell insulation foam. Cut it to size…and carve out the stones…it paints well with acrylics…if you have a Lowes nearby…you can buy a 2x2 foot project panel of the green foam
art,
i used pink insulation foam, stacking two pieces of 2" foam, giving me a 16 foot elevation. i think that’s gonna work. if not i’ve got some 1" foam i can add as needed. as for the stones, i am probably going to use real stones glued to painted foam and i’ll use grout or fine leveling sand for the ‘grout’. still undecided. i’ll cross that bridge when i get to it. meantime i gotta finish the wheel. waiting for a lumber order.
unfortunately the historical society doesn’t have alot of information. the mill that i’m building a model of is a conglomeration of several creek-based sawmills across america and canada. it’s not even in the original location of the mill. there is no record of it in the historical society. and unfortunately there are two badly done dioramas of the sawmill at the historical society, along with 4 nice pictures of the reconstructed mill. that was a dead end. i suppose i could check with the county, but i think i’d be spinning my wheels there.
Very nice scratch build. I’m looking forward to seeing this come together, especially the wheel.