This thread was started in February, 2021
Karl.A
February 2021 edited August 2022 in O Scale Builds
Putting the finishing touches and final few things onto my Main Street hotel build
The Main Street Hotel #206 - in O Scale. Karl.A - O Scale Builds - SierraWest Scale Models Forum
and yes, I’m looking at my shelves again thinking about the next project to work on.
Hopefully finished pictures of the hotel sometime later tonight.
Here’s some pic’s of Brett’s incredible HO kit of the Main Street warehouse, once again I’ll be trying to replicate this as closely as possible, but in O scale.
After all, the only way to make Brett’s kits any better, is to make them bigger…


Comments
kebmo
February 2021
i’ve never seen this one. cool structure.
Karl.A
February 2021
Pics from 2011


Karl.A
February 2021


Karl.A
February 2021
The ‘block’ wasn’t perfect, I think because I didnt make enough plaster and had to make up another batch to fill the mold. I had to go back and try to fill in these flaws with more plaster before starting to carve the brickwork.


Karl.A
February 2021 edited February 2021
Time to dust off the other structure and see whats under the mess.

Karl.A
February 2021 edited February 2021
not too bad…


I like the roof texture, I guess I’ll stick a vent pipe or something where that white spot is on the roof that wont come off, no biggie.

Wes
February 2021
Not bad at all. You seem to be on a roll.
TomMich
February 2021
I was wondering how you were going to recreate the brick structure in O Scale. Great solution but requires a LOT of patience to carve all that brick. Great job!
Karl.A
February 2021 edited February 2021
Thanks Wes and Tom, it wasn’t too bad Tom.
If I remember correctly I sat out on the deck with some ‘refreshments’, the block of plaster, a dull exacto and a straight edge, just enjoying the sunshine while I worked.


Mountaingoat
February 2021
Wow, that looks great!..Rick
MuddyCreekRR
February 2021
Now…create some masters like that brickwork and cast some resin walls…lol…not enough nice looking brick structures out there in O scale…
Karl.A
February 2021 edited February 2021
Thanks Rick and Art,
Not enough demand to make it worthwhile Art, also not enough good/interesting/viable designs of structures to make it interesting enough to hold my attention.
Made some progress on this build this afternoon though…
One thing that made me shelve this project way back was that I wanted the porch lit and couldnt figure it out, so, I got that out of the way first today with just some basic lights to illuminate the ‘wrap around’ porch. Also tidied up the tar paper edges.


After that I completed the full rafters for the porch roof.


Karl.A
February 2021 edited February 2021
Now the lights were in I could progress,
I sanded the doors to fit correctly, touched up the bare wood and installed them.

Next I fixed the door and windows on the office area and glued that on to the structure.
After that I rebuilt the porch posts and framing, not glued, just placed.
I’m going to detail the porch/loading dock before I glue the posts/roof on.

Mountaingoat
February 2021
I can’t see how you can accomplish so much in such a short amount of time and still do such outstanding modeling!..Rick
Karl.A
February 2021
Thanks Rick,
Dont forget alot of this was built a while ago, I’m just going back over things, fixing things, finishing things, putting things back together, and then assembling.
Although I’m just about at the point now where I’m actually going to have to start modeling and building things and doing some real work…

MuddyCreekRR
February 2021
I wasn’t being serious about the castings…but I am serious about the fact there are not enough “good” brick or block structure kits out there…we need more…I need them for my city/waterfront area of the layout…I guess I need to try the sculpting of the foam…
Karl.A
February 2021 edited February 2021
Message me with some ‘small’ interesting structure designs or pictures, if you have any, I aint carving a 3 story, 2 street warehouse though… hahaha
MuddyCreekRR
February 2021
I think I want to try my hand at it…it’s a skill I need to figure out…I’ve always wanted to try it…I’ll post a few photos once I do…but Thanks for the offer…I don’t want to slow you down…lol…you are on a roll…
Karl.A
February 2021 edited February 2021
Never said I’d do it this week Art, maybe next week, ha,
I’d be interest to see some pics though, and some smaller aesthetic structures.
and of course your progress/results when you get there.
MuddyCreekRR
February 2021
I’ll will put some thought to that…I think I’ll try to do a shallow backdrop building to see what I can do…you have given me good ideas already just by me seeing your brickwork…
MuddyCreekRR
February 2021
What tools do you carve with…a #11 blade?..
Karl.A
February 2021 edited February 2021
yes, but an old dull blade and use the back, or a sharpened to a point micro screwdriver, this gives a wider more prototypical mortar line. Using the blade the right way is much too thin. Also you’ll be able to get different effects if the plaster is still ‘cold’ (damp), as opposed to when it has fully dried out.
brownbr
February 2021
Nice brickwork. Glad to see you light it up.
TomMich
February 2021
What’s so great about the brickwork is the variability in the texture. Some bricks appear to be protruding and then there are those that are recessed. The color is also very realistic. Great work Karl! A little explanation would be appreciated.
Joel
February 2021
Love the carving. Great brick work and weathering on the metal doors is spot on. The lighting should help bring some focus on the amazing castings. looking forward to seeing it all come together.
Karl.A
February 2021
Thanks Bryan, Tom and Joel,
working on some details to go on the loading dock and glue some dock legs back on…

Karl.A
February 2021
Decided to add support chains instead of the usual brass rods.
Test fit…


Mountaingoat
February 2021
Love the chains. I will have to remember that for a future project. Thanks for the idea…Rick
Karl.A
February 2021
Thanks Rick, I was looking for something a little different.
Some details.


Karl.A
February 2021 edited February 2021
I had the porch roof’s basically done a couple hours ago, ready to install, but for some reason I delayed in gluing them down.
Now, I know, I haven’t done a great job on the details but I still hesitated to cover them up. I guess it was a point of no return…
(everything’s fixable)


So, I glued the porch posts and framing in place and just sat and looked at it like this for the last two hours or so while watching the news/TV.

Time to stick that sucker down… I guess…
kebmo
February 2021
it looks great. really great.
Karl.A
February 2021 edited February 2021
Thanks Kevin, I appreciate that,
especially as I’m kinda hitting a sticking point, not really sure where to go next…
sitting, staring alot right now…
Definitely doing a kit build after this one, no thinking, just following the instructions.
brownbr
February 2021
The deck is a well ordered mess. Looks great.
ALCO
February 2021
I’m going to add these pix to my notebook that has your tutorial on painting castings. Nice natural colors with subdued splashes of color. Good stuff.
Joel
February 2021
Looks great. Love the chain for the awning support. The details won’t be lost because of the lighting. It’ll actually be enhanced in a way - more intimate.
Wes
February 2021
Id be more than happy with the result Karl.
Karl.A
February 2021 edited February 2021
Thanks so much Bryan, Alan Joel and Wes, I’m happy as it is, I always hate putting roofs on though.
I spent the last few days basically just sitting and staring as I mentioned to Kevin, this is not the part/stage of a build I relish while I’m doing it. So far it works out, but I get too tough on myself while doing it, and then, everything is fine. Eventually things just seem to come together.
I worked out and cut a new base for the diorama, which is surprisingly bigger than I thought I would need.
After that I laid out the main structure, built another mock-up for the work shed and started planning out the scrap yard. Figuring out the details and the spacing. I also made the ties and epoxied them down.

I also worked out the signage I wanted, one for the face of the brick building and I’ve always wanted to do a peeled, aged sign, painted onto a fence, this dio, the way I laid it out, gave me that opportunity, it took me several hours last night to figure it out but I’m fairly happy with the result.

Tonight I primed some of the details for the scrap yard scene, found the grout I needed in the garage for the base so I’m planning to get that down tonight.

Mountaingoat
February 2021
This is looking great. It should come together perfectly as usual…Rick
KCSTrains
February 2021
Karl, you work faster than anyone I know … and you get great results. Amazing. Phil
mikemettelka
February 2021 edited February 2021
What color grout do you use? Sanded?
Karl.A
February 2021 edited February 2021
Sanded
for the basic initial base a blend of 2 parts linen 1 part summer wheat mixed for a mid tone.
when going back and detailing…
light areas straight linen for pathways, roads, etc
straight summer wheat for darker areas, ie under scenery, around details, next to structures etc.
Karl.A
February 2021
I hope so Rick, I’m not sure about perfect but, I’m not going to post those pics..ha
Thanks Phil, I really appreciate that.
Jerry
February 2021
What a fine job you’ve been doing on this one Karl. You still have that magic touch when it comes to detailing.
Jerry
mikemettelka
February 2021
Thank you Karl!
Karl.A
February 2021 edited February 2021
Thanks Jerry and Mike.
I laid the base layer of dirt last night and left it to dry. Structures and fence are just placed to show how much space I’m working with for the yard.
Working on the work shed right now so that I can glue it to it’s foundation, then add legs to the fence and place that.

While clearing up I found some corrugated panels already etched, I cant remember what they were for so I’ll use them for the work shed.

Also started putting the first layer of finish on some of the main details so I can plan the space out.

and started adding some weathering to the roof panels.

More later.
Karl.A
February 2021


Mountaingoat
February 2021
I swear you have a magical touch. How you do that many details that fast with such fantastic results. I would be days just trying to get close to what you do…Rick
Karl.A
February 2021 edited February 2021
Thanks Rick, very kind of you to say so.
I just wish I could plan things out and lay them out as quick as I can paint them.
After the last pics I decided I needed to start planning things out before I started weathering anything or painting anymore. An hour or so to paint them and then 2 or 3 moving them around.
This is just my fourth pass or so to find mistakes and sightlines of the arrangement, still a few things to move around with these larger details and some to eliminate before getting to scenery and then smaller details.
A couple of things I know I’m going to change from this layout but it’s closer, now I need to build a few sawhorses, a workbench and find a welding cart to start filling it out and see where I’m headed.
Visualisation is good for starting out but now I need specifics to fill out spaces and hopefully get things ‘right’.


SteveCuster
February 2021
Looks great Karl! Is the rust on the panels only chalk + alcohol or did you use some paint as well?
Karl.A
February 2021 edited February 2021
Thanks Steve, which panels ? The roof panels or the mack truck body panels?
I looked everywhere in my kits for a SW welding cart, I know I’ve got one somewhere, but, after an hour last night and another hour tonight.
I gave up looking and grabbed some brass rods/shapes and my soldering iron.
Not having that part has stopped me on further progress, laying out the yard.
Of course we all know that my SW one will show up tomorrow, now that I don’t need it, but that one can wait for another project.


Another hurdle, hurdled, not weathered/finished yet, but, planning out progress can resume.
Robert.G
February 2021
The rust on the corrugated roof is very well done. Not over-done. And I like the sagging of the tarpaper roof. Overall , a nice diorama Karl.. Can only get better.
SteveCuster
February 2021
Karl I was referencing the rusting on the corrugated panels.
Karl.A
February 2021
It’s just paint right now Steve. Burnt umber and a very little raw sienna over that.
I may put a little dry rust chalk on when it’s glued down at the end but I’m still handling it and working on it so chalk would get messed up at this point.
SteveCuster
February 2021
Thanks Karl. I can never get the newer but a little rusty look on my corrugated roof. It never looks good when I do it until I keep rusting it until it’s a rusty weathered rusted out junk roof. Of course the norm in real life is straight gray or other paint or what you have here with a little sign of rust but still in tact.
Joel
February 2021
Karl, fantastic details. Love the welding cart. As always looking forward to it all coming together.
Karl.A
March 2021
Steve, I have a 1/2" brush with stiff bristles, it’s a very cheap brush from the paint store, I very lightly put the tip of the bristles into the paint, then dab it off till I get a pattern I like, then dab it onto the panels. The result of the first step of this method with just the burnt umber is shown above. If you want pics of the full process I’ll do it next time for you.
Thanks Joel, I appreciate it, I’m working on the small tedious things right now as I didnt have much model time last week, updates to follow in the next posts.
Karl.A
March 2021 edited March 2021
As noted in my last post, not much modeling time, or motivation last week, so I decided to just do one small thing most days when I could. Several sessions were also spent going through some of my drawers, organising and purging.
Anything notable, or maybe what I thought may be vaguely interesting I photo’d.
I really wanted to get to work on the diorama (which is unlike me of past) but I knew there was way too much to do first… so, I took everything off the base, went back to basics and reigned myself in.
I re-laid out the scrap scene several times over a couple of nights and finished the details for that area.
I worked out the scene between the tracks and brick building
I worked out the front wall for the brick building and planned that.
I worked out the work shed area, including roof details and porch
Made the roof details for the main barn and finished the porch roof
Made the roof for the brick building and made roof details
Detailed the yard fence in respect to the yard
Completed the scrap boilers for the yard scene
Painted/weathered/built all the details for the scenes above, including pallets, stairs, benches, etc.
I think the last thing to do before getting the base back out and pulling it all together is to finish the small things on the actual structures, ie, rafter tails, signage, door handles, touch up, etc
I started on finishing the brick structure, so here’s those pic’s…
Karl.A
March 2021 edited March 2021
Tonight’s progress…
There are several flaws in the casting for the brick structure from before I carved it as can be seen on page one, luckily most of these were fixed or will be hidden by details so no big deal.
There are two on the front wall high up, one will be hidden by the vent, I was going to hide the other with a sign but, it was too low. My hesitance in filling this hole has been getting it to match the finished wall I did 10 years ago. Finally I took the plunge to fill this very visible hole.

I filled the hole with some spackle on a toothpick and exacto carefully, carved and shaped and cleaned off the surrounding bricks and painted as closely as I could to match, here’s the result.

I removed the three metal doors from the structure as they looked crooked to me, I fixed/rebuilt/adjusted the original green metal windows and then built a new door for the front wall.


The windows were all already spaced for depth and had blinds, however several window sills were missing, so, I made, painted, added the missing window sills and then framed out the front doorway for the new door.
Next I re-glued the metal doors into the side wall and added that window.


Once all that was dry, I glued the awning frame in place, added the sign for the front wall, (which is two brick rows above the hole repair) and once dry I added the corrugated to the awning.
(I must have knocked the sign during this process as you can see it’s crooked, this has been fixed since this picture.)

I guessed that the item to the right of the sign is an airduct on the original kit, so I made one from card, painted it and rusted it to look like metal and as you can see it covers that final visible flaw on the upper front wall nicely.

I think I’ll probably finish out the yard shed and main barn tomorrow… pics on that tomorrow.
kebmo
March 2021
looks really fantastic. i love the doors/windows.
Mountaingoat
March 2021
You continue to totally amaze me. I didn’t see those errors until you pointed them out and the fix to the wall brick completely blends. So much accomplished in a single evening…Rick
admin
March 2021
Your brickwork is outstanding. Love the doors and windows too…
ALCO
March 2021
Best Diorama Doors of the Year Award for sure!
Karl.A
March 2021 edited March 2021
Thanks everyone, I really appreciate all of the comments. I’m really pleased with the doors and windows and thankful I was able to salvage and repair the original windows. I always loved the way they came out, and the rust texture on the doors.
Time for me to go get some refreshments and then return to work on the yard tarpaper shed and scene.
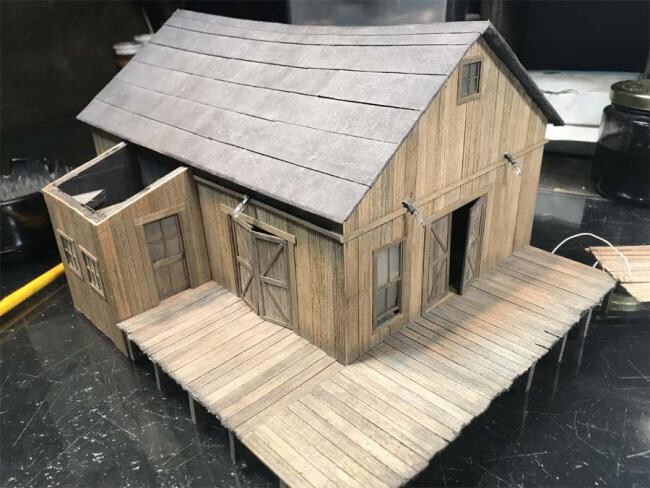
Karl.A
March 2021
I’ve got the ‘work shed’ pretty much done, I’ll need to get it on the base to glue everything down obviously, but, that’s the easy part,
for me working things out and placement takes all the time, I’m 99% happy with this, I’m sure a little will change as it gets glued down, but not much.


Now I can move on to finishing the main barn structure…
Karl.A
March 2021 edited March 2021
Worked on my favorite thing tonight, rafter tails and fascia boards…
I also added the deck bracing, while I was waiting for those to dry I got bored so I painted the smoke stack which I built last week for the brick building.
(It’s painted black, but, the strong lights make it look silver.)


As I noted earlier in this thread, I want to replicate the HO kit as closely as I can, so,
here’s the HO version, and the steps I took to come close to the original, with what I found in my drawers.


Karl.A
March 2021 edited March 2021
Time for a break, food, bed

see you tomorrow…
kebmo
March 2021
that’s some great modeling!
Robert.G
March 2021
Indeed it is.
Joel
March 2021
Amazing, as always.
Karl.A
March 2021
Thanks so much Kevin, Robert and Joel, much appreciated.
I just got the rafter tails finished, went around and made/added all the door handles, finished and glued down most of the roof details and then touched up all the white ‘chips’ in my brickwork.
So, now its time to clear the desk, get the base out and start putting all this together and finally move it onto the finished shelf…

admin
March 2021
Absolutely love the tarpaper shed!
Karl.A
March 2021 edited March 2021
Thanks man, I really appreciate that, it was a sticking point of the build for a long time, as you know.
I’m really happy with it now and looking forward to how it will look in the scene, hopefully some diorama construction this evening.
Karl.A
March 2021
Ok, desk cleared, scenery out, plans in my head and time for an evening of “dirt and details”.
It’s time to start gluing things down, fun time !!


kebmo
March 2021
off to a great start. keep on chooglin’…
Karl.A
March 2021
Thanks Kevin, working my way along the fence line.

Mountaingoat
March 2021
Wow, that’s looking great. Hardly wait for the glue to dry so I can appreciate the colors more. Where’s the empty Corona bottles going to be on the diorama?..Rick
Karl.A
March 2021 edited March 2021
Thanks Rick, you and me both.
In the trash cans of course…


Karl.A
March 2021 edited March 2021
Yes, I’m trying to post about every hour, to keep me motivated, when I get to a stopping point.
I know most of y’all are asleep, but, it’s helping me.


(just ignore that crooked stack on the shed, pretend it’s straight 'till tomorrow, convince yourself it’s just the camera angle, that’s what I’m doing…)
Robert.G
March 2021
Karl, just keep on doing what you’re doing, it looks just incredible..!!! Beautiful composition of all the ‘stuff’ lying around and sunk in the dirt.
Karl.A
March 2021 edited March 2021
Thanks so much Robert, I had hoped you would look in during the middle of my night, yet it’s your early morning. I appreciate your kind words.
I’ve got the main yard area done, which was my goal for tonight, I’m really happy so far.
So much so I may move on to the next area… I think I’ll grab a beer and a break, but, I’m in the mood to keep going.
Here’s a quick look at tonight’s progress… obviously still a lot of wet glue and still much more to fix/finish.


so far…
Karl.A
March 2021
An hour or so break, an egg and bacon sammich, and of course some thinking time…
now it’s time to move on.


Karl.A
March 2021 edited March 2021
Sorry man, I really, REALLY tried several things to replicate the big tire pile for this area but, nothing worked good to look good in O’scale, about 6 months ago I decided to give it up and just let it go.
Here’s what I came up with instead… still basic, but, a little more to add.


kebmo
March 2021
that’s looking fantastically messy. very authentic looking.
Karl.A
March 2021
Well, I guess it’s time to put the coffee pot on and get some caffeine…

Mountaingoat
March 2021
I am awestruck at what you can do. Incredible modeling. Composition, coloring, weathering; just no words for it all…Rick
brownbr
March 2021
Looks great all around
admin
March 2021
Mountaingoat said:
I am awestruck at what you can do. Incredible modeling. Composition, coloring, weathering; just no words for it all…Rick
Join the rest of us!
KCSTrains
March 2021
Karl, you really pulled this together quickly and it looks great. Not to hold back on you, the tarps on the tanks bother me a bit. I asked myself why … I guess they stick out a bit and you taught me that you don’t want any one element in the diorama sticking out. Maybe if they were darker, they would blend in better. BTW, the texture of the tarps are wonderful. Of course, this is your build, but I wanted to give you my honest feedback. I’ll shut up now. Phil
Joel
March 2021
I can’t believe I go to sleep and wake up and you’ve done all this. And not only that but done to such a level of detail. Fantastic work. Another 20 minutes and you should be done.
Jerry
March 2021
Lot’s of talent there young man!! Great job!!
Jerry
sdrees
March 2021
It is looking just fantastic Karl. WOW!!!
TomMich
March 2021
Love all the details! Great placement and selection. Amazing amount of progress in just one session, but when you’re on a roll… I agree with Phil the tarps do stand out. Perhaps grunge them up a bit.
MuddyCreekRR
March 2021
Fantastic work Karl…I have been taking a tack like you…sitting back looking at what I’ve done over the past few days and thinking…your diorama has given me some ideas as to where my truck/tractor/boiler repair project needs to go…I really like the tar paper structure…may emulate it it bit…I need to find some more boilers and/or parts thereof to do a similar yard scene. Alas no photos as my camera is glitching…soon fixed I hope…
Karl.A
March 2021 edited March 2021
Thank you all so much for your great comments they are really appreciated and encouraging. So good to read you all.
Took me a little nap today while the dirt was drying and woke up to see everything was pretty much looking good at this ‘stage 2’.
A few things to fix looking back at the pics and a journey still ahead, so I decided to start with the work shed.
I’ll go back and reply/answer any specifics later, and TomMich, I’m not ignoring your question from page one, I really will ‘circle back’ and give you that info.
So, the tar paper shed, I popped off the epoxied support wires for the crooked smoke stack from the roof and straightened that sucker out.
Next I added the flashing to the porch roof and fixed those marks on the wall above the window and to the right of it.
I started adding the next level of detail to the shed porch, a few more things to start filling out the spaces.
Now that the dirt was dry I also started weathering the dirt and adding some shadows and blending in some of the details that stood out.


Thanks for your keen eye and honesty Phil, you were right, fairly OK in person but they do stand out in pictures, and honestly, under these lights in person too. I put a few coats of dark A&I on the tarps today to darken them down, I’ll probably try a few more coats and some chalk tomorrow. After that if we’re still not happy I’ll pull them off and just start over.
As always your comments are valued and appreciated, keep them coming.
Karl.A
March 2021 edited March 2021
Pretty much the same angle for these two pics, kinda interesting to go back and compare them, one was from last night the other from earlier tonight after I did a little work on the scene.
There are 17 things that I fixed/added/changed… can you spot the differences ?
Last night…
Tonight…
Mountaingoat
March 2021
I count 13 detail items added, flashing, 2 touchups on the wall and shadowing. We all thought it was amazing before the changes. Now, WOW! So much more visual eye appeal. Man am I humbled…Rick
ALCO
March 2021
And the hits keep on coming! Great job. I really enjoy your craftsmanship…and speed!
Karl.A
March 2021
Good spotting Rick, thanks.
Thanks Alan.
Worked on another area a little this afternoon, I think it still needs ‘something’, but, I’m going to leave it alone and move on for now, hopefully an idea will hit me.


TomMich
March 2021
Karl, Amazing how the shadows make the details stand out. Never thought about doing that. Will definitely keep it in mind. I especially noticed it along the wood porch. As for the last photo there appears to be a void under the workbench. Perhaps some details showing under it would help.
Karl.A
March 2021 edited March 2021
Thanks Tom.
I like adding the shadows, (it is in my detail painting thread too), I just finished adding them around the pipe pile on the dirt, nicely adds some depth.
I painted and weathered some things for under the bench, here you go Tom…


Damn thats a close up shot… haha
Karl.A
March 2021 edited March 2021
Oh, I had also previously added some ‘tufty’s’ around the pallets and barrels, here is a wider shot.
Much better, thanks Tom.

(Wider shot is much better for my comfort zone… ![]() )
)
Karl.A
March 2021
I’ve also added quite a few smaller things to the junkyard along with some weathering and adjustments.
I’ve darkened down the tarps ALOT with a&i following some great advice confirming my own niggling feeling, thanks Phil !! They are now looking alot better, they still look a little light in the pics under all these work lights, but in person much better, we’ll see how they look in some outdoor shots and adjust some more if needed, thoughts?
Two things to ignore in these pics, the funky look going on with the porch decking, that’s some strange lighting effect caused by my work lights. Also all the little white flecks, that’s just grout dust as I’m working around, that will all get dusted off as I get closer to finishing the area.


Mountaingoat
March 2021
I so want to comment, but am just speechless…Rick
Karl.A
March 2021 edited May 2021
Oh come on Rick, I can take it, haha,
There are 7 immediate things (which is all I see) that I should redo on this last close up pic of the bench, well, 8 if I’m honest with myself. Maybe I’ll go back to it, but I doubt it, well, maybe after I finish everything else, that whole bench is under only 2" long, take my glasses off and it looks perfect.
I’m gonna go grab a snack, but, here’s my project area for tonight…


Karl.A
March 2021
Nothing really exciting for this area, when its dry I’ll go back and add weathering, blending and some smaller things.


Mountaingoat
March 2021
Going so fast usually leads to shortcuts and compromises, yet your modeling is beyond amazing. You are still getting near perfection in color, arrangement, believability, etc., etc., etc. I have no idea how you do it…Rick
AlexR
March 2021
Karl,
The corrugated roofing.. did you post how you do that anywhere? I havent had much luck and need to figure that out pretty quick if i plan on ever making any industrial… ![]()
Karl.A
March 2021 edited August 2022
Thanks Rick,
Mountaingoat said:
… I have no idea how you do it…Rick
Practice, planning and preparation…
Practice:- When you’re lucky enough to have painted thousands of Brett’s incredible castings, they don’t seem to take so long.
Planning:_ Work out the area with bare castings so you know what you need and exactly where they are going, take a pic or 5 so you know where to put them back later at the final stage.
Preparation:- Paint and pre-weather what you need so they are ready to be placed when you work on the scene.
Don’t be afraid to go back to an area or detail if you’re unsure about something and redo it if you need to, don’t let that stop you starting.
(I need to redo the ground infront of the shelf unit, it should have been bare, dry dirt… no biggie)


Karl.A
March 2021 edited March 2021
Alex, I don’t think I’ve described that method here.
If you have the O scale BlueSky kit my method is outlined in the manual for the tractor shed roof.
If you don’t, SteveCuster also asked earlier in this thread, I replied that I’d post the process next time I do it.
Karl.A
March 2021


brownbr
March 2021
Shaping up quite nicely. All of the attention to detail in each mini scene is making a grand statement.
SteveCuster
March 2021
Looks amazing Karl!
TomMich
March 2021
Great work! Love your use and placement of details. The clutter under the workbench removes the dark void and adds some interest. The different size barrels in the corner with the leaning pallets is a great little scene!
KCSTrains
March 2021
Karl, the tarps look a whole lot better. Now they are to the superior quality of the rest of your build. Amazing speed and results. Phil
ALCO
March 2021
How about a burn barrel? A pile of empty Coronas?
Karl.A
March 2021 edited March 2021
Thanks for all the great comments everyone, really appreciated to read.
Thanks for the initial input on those items Tom and Phil, extra eyes are always helpful, and gratefully received, good thoughts Alan, no space for a burn barrel on this one, some empty coronas may be appearing soon.
The most humbling thing about doing an upscale scratch build is realising that I’m just copying.
Remembering that Brett has already originally done this scratchbuild, but in HO…
This always hits home when I get to a tricky item and think, “How the hell can I do/replicate that ?”. Then I remember that Brett has already done it, half the size !!! Also he designed it in a way that makes it posible for hundreds of modelers to buy the kit and also do it, just as well.
Sharing my thoughts as I hit a tricky spot, and a quick nod of appreciation and admiration to “the big guy”.
I took last night off from this, working on something else, back to it tonight and hit a wall, hence my thoughts, up dates later.
Karl.A
March 2021 edited March 2021
Pictures of the item that led to the previous post… a louvred vent, I had it figured out but had put off doing it, I’m getting to the end of this build so no more time for delays or excuses.
“Git 'er dun”


Karl.A
March 2021 edited March 2021
The last side of the diorama, there were many back and forth’s in my head on this area, the original paved road?, a dirt road?, raise the structure?, lay a foundation?, … etc, etc… a 10 year thoughtful tough decision, I’ve finally settled on a compromise, I’m hoping it works out.
The starting point tonight, and actually right now.

A quick, different view of the scrap yard, from the front of the dio.

Template for the concrete area.

Template transfered to stiffer card and curb stone added.

Planning out the details, some left over from other areas, some scratched, and some new.

I’m not happy with the sidewalk right now, time for some adjustments…
Karl.A
March 2021
While I was typing and posting I re-did the side walk and added in a slope for delivery trucks.
This eliminates the need for a wooden ‘step up’ as I had originally planned.

nextceo
March 2021
Looks Awesome Karl! Thanks for sharing…
Karl.A
March 2021
Thanks Alan,
I think I’m just gonna stare at it until tomorrow before I glue anything down just to be sure. I’m 99.9%, but fresh eyes in the am will confirm it. After that I can make some progress tomorrow evening.


Joel
March 2021
Just incredible, so much to examine. You hardly leave time to appreciate one amazing scene before bringing on the next.
kebmo
March 2021
isn’t that the truth…?
Karl.A
March 2021
Thanks Joel, I’m trying to stay consistent.
I’m still happy with the sidewalk so I can move forward this evening, I’ll try to keep you up dated so you can keep up… haha.
Sidewalk first, then base dirt, then detail painting while that all dries. Then… we’ll see…

Karl.A
March 2021 edited March 2021
Just aint feeling it tonight, been watching more TV than modeling, prob because I was waiting for dirt to dry and that was messing up my ‘flow’.
Anyways, I got the base layer of dirt down, the sidewalk installed and base weathered, also got the details painted and weathered. Here’s some of them.


More tomorrow.
Karl.A
March 2021

Mountaingoat
March 2021
Progress! I bet you can feel the finish line…Rick
Karl.A
March 2021
Indeed Rick, but,
I’m just slowed down and enjoying the journey for now.


Mountaingoat
March 2021
Looking great as always. Love the chain instead of rod for the porch roof support…Rick
Karl.A
March 2021 edited March 2021
Thanks Rick.
The chains aren’t glued in at the top yet which is why they sag a little in the previous pic, I’ll glue them in, tight at the end, I keep bumping them right now. I pushed them tight (again) for this pic.


TomMich
March 2021
Your standing seam roofing looks real. How’d you get that rusted in the center effect, surrounded by the gray coloring? Did you use chalks to achieve it?
Karl.A
March 2021 edited March 2021
Thanks so much Tom,
I tried to replicate some proto pics, here are a couple of them, I got close, then maybe went too far, then wasn’t completely happy with it.


Because I haven’t been really too thrilled with it is why I haven’t shown it too much. Also that’s the reason it isn’t glued down (and hence always looks crooked) and also why I haven’t added the flashing, cap or finished the stack.
But, here’s how I did it.
Etched very lightly to get rid of the shine, usually works but this time it left black marks.
So, I sprayed it with grey primer. I didn’t like the shade of primer when dry.
So, I painted it with a grey craft paint using a brush. Still not happy with the look.
So, I brushed the grey with 408.3 chalk, that seemed better to me.
For the rust effect,
I dabbed on burnt umber with a tiny sponge (almost dry) down the center.
Once dry, I dabbed on burnt sienna to cover about 1/3 of the umber.
Once dry, I dabbed on some raw sienna highlights for new rust.
Then, once dry I dusted it with some rust chalk.
As I noted, I’m not 100%, so not glued down yet, but, it is growing on me.
kebmo
March 2021
the roof looks excellent.
dick52
March 2021
Looks great, good ole Mother Nature at work lol
TomMich
March 2021
Thanks for the explanation. The effect is what I see so often on metal roofing. Rusted in the center and are more gray along the edges. The effect on yours is spot on in my opinion. The color on yours is perhaps too brown it needs more orangish coloring from burnt sienna with raw sienna highlights.
Karl.A
March 2021 edited March 2021
Thanks Kev, Dick and Tom.
I did use burnt sienna, not sure why I originally typed nutmeg, that’s what I use for wooden tool handles, I musta been thinking of doing an axe or something.
It does look more orangey in person.
Karl.A
March 2021
No progress this weekend, but, I did assemble and paint the old gate.

kebmo
March 2021
the gate looks great.
ALCO
March 2021
Yup, very realistic. Have to archive this pic for future reference. Makes me wish I was more observant about what’s around me…
MuddyCreekRR
March 2021 edited March 2021
I am a big believer in looking at real examples of weathering. A lot of people go way too far…others not enough. I always ask myself…how old is the structure supposed to be…how well do the “little people” that own and run the place keep it up…and one thing I’ve noticed on some layouts…the direction the “weather” comes from is not always consistent on a layout. You need to pick an area to call “north” on your layout…or at least keep all the heavy weathering coming from “one direction”. All that said…I think you have a really good look on that roof.
Karl.A
March 2021
Thanks Kev, Alan and Art,
added the hinges and lock to the gate and glued it on.
I’ll redo the lock once the gate is dry.
Finished dio pics later…


ALCO
March 2021
A lock? Are you kidding me? I gotta convert to O scale!
MuddyCreekRR
March 2021
You fab up the lock…?
kebmo
March 2021
heheheheh…
yeah, we have locks.
Karl.A
March 2021 edited March 2021
Thanks Alan, no need to convert, just do both…
I have made them in the past Art but this is a rare SW casting, adjusted.
Yeah Kev, credit to you, I was always gonna have the chain, but, you pushed me to go find a lock as well.
Karl.A
March 2021 edited March 2021
A few minor, final things to adjust, fix, add, but, I’m calling it done, for now.


Mountaingoat
March 2021
Absolutely gorgeous Karl. …Rick
Karl.A
March 2021
Thanks a lot Rick, appreciate your comments. I’m resizing some more pics now, more shortly.
admin
March 2021
stunning, love those outdoor pics…
Karl.A
March 2021
Thanks man, unfortunately no bamboo to fight with getting in the shots, I did try to get the trees kinda scaled. A nice semi sunny day for dio pics. Really appreciate it.
Heres a few more…
Karl.A
March 2021 edited March 2021


Not so sure I like those, but, I’m working my way around the dio now …
Mountaingoat
March 2021
The air compressor on the pallet definitely caught my eye along with the freshly chopped wood. The metal roofs are so correct, etc., etc., etc…Rick
Mountaingoat
March 2021
I did notice though, no spikes holding the rail down.
Karl.A
March 2021 edited March 2021
Rails are just lying there,
the track work, like my recent blue sky and woodcutters dio’s isn’t done. It’s the same 2 rails on all three dio’s just for pics. I have plans for the track work, to come later.
I know it detracts, but bare rail is better than none.
Thanks for the kind words, the metal roof also still isn’t glued on or flashed or capped for the brick structure, cos I’m still not 100% sure about it , but, I’m moving on, for now.
Karl.A
March 2021 edited March 2021
That’s why I tried to keep the track out of most of the pictures, as you’ll see. But that one of the dock was unavoidable…
I did say I didn’t like those pics… haha
The air compressor on the pallet is copied directly from Bretts HO model, too awesome of a detail not to try and replicate.
Karl.A
March 2021
Some of the scrap yard…


brownbr
March 2021
Nice presentation
Karl.A
March 2021
Thanks Bryan.
The street side…


sdrees
March 2021
Hey Karl, you are the master. What a great project.
Karl.A
March 2021
Thanks Steve, much appreciated.
Here’s the last side…


OK, I’m done.
Robert.G
March 2021
What an achievement, again you deliver us one fine diorama. The setting outside, on a less bright day , make it even more realistic. Lots of brilliant details like the broken corner in the brick building. So well done Karl. Love to see more photos ,and I am sure, I am not the only one.
kebmo
March 2021
what robert said…
nextceo
March 2021
Fantastic Work Karl..thanks for sharing…
PaulS
March 2021
Karl.A said:
Karl, absolutely fantastic diorama, It all looks superb. Thanks for allowing us to follow along and presenting your thought process as you moved from scene to scene.
All the photos are wonderful but to my eye the one above is the money shot, ‘Is it real or Memorex?’ The wood pile progression with the weathered wheelbarrow against the fence, corner shot of the building and peaking over at the scrap yard, etc… WOW!
Looking forward to your next endeavor at the bench !!
–Paul
dick52
March 2021
Fantastic, truly inspiring
Joel
March 2021
Just fantastic. The second pick of the boiler graveyard is just stunning. Great moody little scene. Love the lock.
Karl.A
March 2021 edited May 2021
Thank you guys, really appreciate all the kind words. It was a really fun build and many thanks to Brett for the original design/kit and all his help along the way to make this scratch build possible.
Karl.A
March 2021 edited March 2021
PaulS said:
Looking forward to your next endeavor at the bench !!
–Paul
That ‘might’ be a little while, I’ve just done 5 complete builds in just the last 3.5 months, all fully finished, detailed and scenicked dioramas.
I’ve got a few other things I may do before I start my next build, we’ll see.
TomMich
March 2021
Great work Karl! Love all the details and your placement of them. After your explanation of shadowing I see how it really adds to the overall effect. I’ll have to keep that in mind for my work.
MuddyCreekRR
March 2021
Really nice…
KCSTrains
March 2021
Karl, my apologies for my delayed comments to your build. You are the master!! I have run out of superlatives for your builds. What is difficult for me seems second nature for you. Can you provide a shot of the entire diorama? Thanks. I’m glad you’re building again. Phil
Karl.A
March 2021 edited March 2021
Thanks so much Tom, Art and Phil.
Thanks Phil, it’s good to be building again.
How’s this for you Phil ? Is this what you wanted ?
Unfortunately my work desk is full of another project right now and that Mainstreet dio is on the other desk behind me, so, the lighting ain’t great.
It’s 30" x 18", if you were wondering… ha


Mountaingoat
March 2021
Thanks for the overall photos. Sometimes we need the whole story as well as all the vignettes…Rick
Karl.A
March 2021
Indeed Rick, they were in mind to do, just hadn’t got to it.
Thanks to Phil for giving me a ‘nudge’.
KCSTrains
March 2021
Thanks Karl. That’s exactly what I wanted.
Karl.A
March 2021
Great Phil, thanks for the ‘nudge’…
brownbr
March 2021
Impressive for sure
dick52
March 2021
As always , magnificent!
Bill
March 2021
My God this is some stunning work, Karl!
Extraordinary!!
KKarns
March 2021
I would have to agree, some of his best work…
Dave_S
March 2021
Karl,
The photos from many perspectives are great. Been following this project for a while hoping that at some time you might share the footprint for each of the 3 structures in
the diorama in O-Scale.
Later, Dave S. Tucson, AZ
prsdgt65
March 2021
Outstanding build.
Pappy
August 2021
Karl. you are the man!! I love the brick work and all.
SteveF
August 2022
Kevin - Now that is a smokestack! Very creative and great use of what was in your drawers.
SteveF
August 2022
Sorry Karl. Long day.
SteveF
August 2022
And yes it is so unique compared to a piece of brass tubing or a soda straw.
glandesjr
September 2022
Hey Karl:
I just saw this and it is awesome, and the fact that it is scratch built and you’re copying one of Brett’s HO scale kits makes it even more amazing. The tar paper roofs are really great, and your detailing is some of the best work. Thanks for sharing so many pics. I learn something every time I look at your work. Thanks.
Karl.A
September 2022 edited September 2022
Thanks for the kind words Grant, glad to read you enjoyed it, I look forward to you discovering the others and hearing from you in those threads.