KKarns
August 2022
It is a nice system to keep the parts organized.
KKarns
August 2022
Thanks much Art! I use a simple brown AI solution which gives the needed translucency.
Thanks Brett…starts with a 3D printed part that is detailed so well and in the optimum resin for the part.
Appreciate that Robert.
TomMich
August 2022
Nice! Really like the partially filled oil bottles! Aren’t these fun to work with?
KKarns
August 2022
They sure are Tom. Haven’t done a full rack yet like you have.
KKarns
August 2022
Failed to mention. The bottle was masked off with a thin strip of painters tape to get the hard line separation. This of course will be hard to see amongst all the clutter of a diorama scene…fun none the less!

Robert.G
August 2022
Now you just have to make sure that you place it in the right angle so the oil inside the bottle is horizontal, but you knew that, right !! ![]()
Great detail .
KKarns
August 2022
Tipped bottle with the oil level was just for fun, will never show up when placed in the actual scene. The ones I’m using for my work will be either empty or partially filled but not tipped like that. Not many instances where that would actually happen! Thanks Robert.
TomMich
August 2022
Place that tipped bottle on the top of a crate full of junk!
KKarns
August 2022
Yeah…that would work!
admin
August 2022 edited August 2022

Working on a brand new group of details including an expanded selection of “glass” bottles.
In addition, I will have more of the hand weathered O Scale Battle Worn detail groups next month. The first batch of these sold out in 15 minutes! I know a lot of you have been looking for these so make sure you’re signed up for my newsletter.
KKarns
August 2022
Awesome additions to the detail collection. I have lost count of how many I have included in the interior of my Shelby’s build alone!
Karl.A
August 2022
Great looking bottle and jar styles, always great to have such a varied and high quality selection.
Looks like a set of 'shine jars may be appearing on my next build…
SteveF
August 2022
Brett - I thought you had already knocked it out of the park with the 3D bottles but these new bottles and jars give us even more modeling opportunities with details that exist no where else. Thanks again!
I’m also anxious to see the new Battle Worn details. I think its exciting that we have a chance to own something from the master himself.
Robert.G
August 2022
AWESOME !!!
brownbr
August 2022
Somebody’s going to try filling up one of those mason jars with nails.
kebmo
August 2022
brownbr said:
Somebody’s going to try filling up one of those mason jars with nails.
karl, i think the gauntlet has been dropped…
Karl.A
August 2022 edited August 2022
brownbr said:
Somebody’s going to try filling up one of those mason jars with nails.
kebmo said:
karl, i think the gauntlet has been dropped…
Already figured out, (I think), just waiting till I get the new awesome jars to try it… hopefully… haha
Quote
TomMich
August 2022 108.205.147.72
Exciting yo see all the new 3D details becoming available.
Quote
Karl.AKarl.A
August 2022 edited October 2022 73.2.191.87
HO Pepsi Machine / Cooler, (because I didn’t have a Coke label).


HO Bottles on HO ice…

Joel
August 2022
Just fantastic stuff. Every release is so exciting.
admin
Ice, of course! wonderful…
KKarns
August 2022
Finished up an HO Scale Hand Truck from Brett’s 3D collection and its going in Shelby’s as we speak!

admin
August 2022

Open mason jar all ready for Karl. I’ll let him add the nails, I just tossed a few scraps of stripwood in to show how cool this piece is. New details coming next month including the new bottles and jars!
admin
August 2022
that hand truck… wowie Ken!
KKarns
August 2022
Thanks much Brett! That detail on the hand truck is just nuts! Those jars…whaaaat!
Karl.A
August 2022 edited August 2022
Awesome, the open printed jars were my plan ‘B’, they are just perfect !!!
Much better and easier than my plan ‘A’, which was to drill the jar out. Amazing stuff !!
Outstanding result on the Hand Truck Ken.
KKarns
August 2022
I agree, that 3D printed Hand Truck of Brett’s is about as nice a 3D detail part as I have seen. It just details itself!
Ice in the cooler!..whaaat! Can’t believe this stuff.
Karl.A
August 2022 edited August 2022
Thanks Brett and Ken, unfortunately I messed up the finish on the open lid while trying to adjust the finish for a real close up of the interior.
So, I’ll need to strip and redo the lid itself, therefor I’m not showing it, but for now, here is a cropped image of just the inside. Amazing that the HO bottles are printed inside the open cooler.

Joel
August 2022
Just amazing!
Jim M
August 2022
Incredible job on the details guys, wow. Love the Mason jars, what a great detail.
SteveF
August 2022
I needed A Pepsi ice machine for my Stump Creek tool shed so I thought I would join in the fun with Brett’s 3D models. I am no where near the quality of the modelers on this forum especially when it comes to detail parts but I thought I would at least give it a try. There is no ice in the machine yet but once I get some clear acrylic, I’ll give that a try as well. I’m including the picture of the machine I found on line that fit my era.


Thanks again Brett for developing these incredible details. I can’t believe you printed the mason jar open. What a detail!!
And fabulous work Ken and Karl on the soda machine and hand truck. Thanks for all the inspiration!
Robert.G
August 2022
The sky is the limit with those details. Just fantastic.
kebmo
August 2022
Karl.A said:
Thanks Brett and Ken, unfortunately I messed up the finish on the open lid while trying to adjust the finish for a real close up of the interior.
So, I’ll need to strip and redo the lid itself, therefor I’m not showing it, but for now, here is a cropped image of just the inside. Amazing that the HO bottles are printed inside the open cooler.
leave it to me to address the elephant in the room. what did you use for the ice? salt?
admin
August 2022
Great job on the Pepsi machine Steve. Color and weathering are perfecto! Gonna look great with your Tool Shed for sure.
admin
August 2022

Here’s a new detail that really shows off the 3D Printing capabilities. The large grease bucket, handle attached but standing out from the bucket body. Very fragile but so very cool. I placed the figure in for size reference, like a 5 gallon paint bucket. Drop a handle in and there you go.
SteveF
August 2022
Thank you Brett. It really means a lot to me coming from a real artist as yourself.
And the hits just keep on coming! Now thats a bucket! The handle on the grease bucket looks like a separate piece of wire not a 3D print. Please let us know when this latest round of details are ready to order. I’ve already started another long list.
EmeryJ
August 2022
A whole lot of excellent work on all these tiny detail parts. Unbelievable!! Keep posting the pics. So enjoyable to see what all of you are coming up with!!
Dave_S
August 2022
Karl.
Can you share a tutorial on making ice cubes? Yours are really very “cool”.
Later, Dave S. Tucson, AZ
Karl.A
August 2022 edited August 2022
Terrific job on the Pepsi machine Steve, weathering is just right, dirty but not destroyed, the label/logo turned out perfect, and i really like the blue,nicely done.
I had already finished painting mine red for Coke before I realised I only had a Pepsi label, oh well, also, I was changing the lid to metal when I messed it up, I’ll fix it tonight as I like the way yours came out.
Karl.A
August 2022
Handle on the grease bucket is really very cool, so glad to see them come out like that as that is the way I drew them on the lunch pails I drew but wasn’t 100% sure if they’d print OK.
More greatness…
TomMich
August 2022
Those jars are amazing! Will they be hollow in HO scale as well? The soda coolers are really nice too. And Ken I haven’t tried the hand truck yet, but yours turned out really nice! Here’s my shop stove.

KKarns
August 2022
Great looking cooler Steve!…weathering is spot on.
Nice work in the stove Tom! I haven’t worked one up yet, but after seeing your fine work, I think I’ll give it a go.
That bucket with handle is just amazing…
ALCO
August 2022
(Sensory overload!)
brownbr
August 2022
You guys are stepping it up 2 notches.
KKarns
August 2022 173.88.78.186
Hey Tom, is that stove O Scale…my HO scale stove doesn’t have a separate door that can be positioned open.
Karl.A
August 2022 edited August 2022
Dang, you guys… My next to play with was going to be the “Hand Trucks” (HO and O) then Ken posted his. So instead I thought I’d do the “Shop Stove” (O) and then Tom instantly posted his great results.
Luckily I still have a good selection to choose from, so I’m going to get to priming before I decide.
Great work by all, awesome to see all Brett’s hard work ‘coming to life’ !
Keep the pics flowing !!!
TomMich
August 2022
Ken, it’s HO. I ordered several and all of them have the door attached in that open position. What I found interesting when painting inside the stove that it’s hollow! I know in the description of it on the website it says that it’s partially hollow for potential lighting purposes, but I was amazed how much room there was inside, even HO. Awesome details! I like working with them! Can’t wait to see what comes out next. Looking forward to the jars and that bucket.
kebmo
August 2022
hmm. i guess i’d better get going on my oil barrel and stand…
Karl.A
August 2022
You and me both Kev, I look forward to seeing what you come up with.
I think I’ll pick something else too.
Karl.A
August 2022 edited August 2022
Well, I still can’t get this new phone to take pics how I like, or the lighting for it right, but …
Here’s a couple of pics of the wonderful O Scale 3D Shop Heater.


SteveF
August 2022
Karl - Looks just like an old steel barrel that’s been subjected to a lot of heat. Great work as usual. I can’t get the video to play when I click on it. Would’ve to see the fire flicker. Not sure if its me or a setting on the forum. Either way very inspirational.
Karl.A
August 2022 edited September 2022
Thanks Steve, the minimal rust effects, soot above the door and ash below the door dont seem to be showing up, I’ll figure out pics (this new phone) again soon, when I stop working so much… haha
You should just be able to click the play button, but I guess its browser dependent,
Try right clicking it…
I’m trying to figure a way to post the link without the forum software auto embedding the video…
SteveF
August 2022
That worked! The lighting effects really add to the overall effect. One of my favorite things about modeling in O scale is the ability to add lighting effects. I realize it can be done in HO as well, it’s just a bit easier in O.
I’ve retyped the link with the notorious missing “H”. So if anyone else is having difficulty, it is just a cut and paste. Here you go:
The crustiness and ash definitely show well in the video. Love it~!
SteveF
August 2022
Ohhh. Now I see why you left off the “H”
SteveF
August 2022
I’m slower than most.
Jim M
August 2022
Karl, very cool. Nice work.
Karl.A
August 2022
Thanks Jim,
It’s a great piece of work, to work with.
admin
August 2022
Wow, amazing what can be achieved…
KKarns
August 2022
I want one!..
kebmo
August 2022 edited August 2022
many years ago i shared a farmhouse on a 40 acre farmette with two other guys in burlington wisconsin (home of tony roma for all you cowboy fans), and the house didn’t have a furnace. every sunday morning before noon we would get in a pickup truck and drive to a stand of trees in the “back 40” and cut firewood. we’d chop it up to be used the following week. we’d take what we had cut the week before to the house and load it into the kitchen where the wood burner was. (we got the woodburning stove plans from mother earth news and made it ourselves. it worked great. it would heat the entire house including the second floor bedrooms. it just wouldn’t heat it quickly. there were some very cold mornings in that place.
the point im getting at is twofold. 1) the barrel would get so hot you could spit on it and it would immediately evaporate (what do you expect from three drunk hippies). 2) brett captured it perfectly.
vietnamseabee
August 2022
Great story, Kev….I have always enjoyed hearing folks “back in the day” stories. Thanks for sharing it
Terry
TomMich
August 2022
Great stove Karl! The lighting effects are very nice! Kev, did Brett capture the 3 drunk hippies perfectly?
brownbr
August 2022
I like it.
Jim M
August 2022
Karl, how did you run and hide the wires for the LEDs? Or, maybe you started a real fire in that stove.
BenPopper
August 2022 75.172.84.62
Alright, my first example that I am going to share on the forum. I haven’t tackled a full on kit yet as I am not there in the order of builds for the layout. But I think I do have a detail here that no one has done yet individually. I have been building a completely scratch built adaptation of an Ambroid O scale Lehigh and Hudson River Flanger Caboose into On30 Narrow gauge for the Narrow Gauge Convention competition here in Tacoma. I knew I was going to put some pegs to hang things from outside the door on the flanger side and when I saw the jacket in the new speeder shed kit, I knew I had to ask if I could get one. I forgot to take a picture of it on its own before I stuck it in there, but here it is. A detail that I hope puts it over the top. Also of note the barrel and Metal Cast jack in the corner also from SWM. I’ll share pictures of the entire thing after it goes on the competition table next week.

brownbr
August 2022
Looks great.
TomMich
August 2022
Nice! Great scene!
Karl.A
August 2022 edited August 2022
Very nicely done Ben, it all looks great.
Hopefully the next pics will have an award sitting next to it.
Karl.A
August 2022
Jim M said:
Karl, how did you run and hide the wires for the LEDs? Or, maybe you started a real fire in that stove.
Jim,
The wires go up inside the smoke stack so that they cant be seen.
Once the heater gets installed in the structure they will come out of the stack midway and run along the rafters as usual, the stack itself will continue up through the roof.
I did take pictures of the adaptions and steps I took along the way that I can post if anyone wants to see them.
KKarns
August 2022
Nice job Ben, great looking scene!
I had featured the jacket with hat in HO Scale awhile back in my HO/HOn3 Eureka Springs build thread. Such a great 3D detail Brett came up with. I’m including the same detail in my Shelby’s build.
Good luck on your competition.

Karl.A
August 2022 edited September 2022
Great scene Ken, I also notice a 3D gas can, a 3D barrel, a hat and probably a couple more of the 3D parts I missed, I’ll let you point them out for the viewers.
SteveF
August 2022
Ben - Good luck on the contest! The details in the caboose really set off what already looks to be a fine build. Unfortunately, I won’t be able to attend this year but the team in Seattle does an amazing job. Enjoy!
Ken - the coloring on that jacket is spot on. Adding details like hats, coats, rags etc. are a great balance to all the metal and wood we use in details. Beautiful scene.
Karl - I did a lighted shop heater once in a black smith shop and really struggled hiding the wires in the scene. I never thought about going up the stack. If you get a spare moment sometime, I would love to see the pictures of how you ran it out the stack and into the rafters.
KKarns
August 2022
Thanks Karl…yup there are several other 3D details in that scene; steel barrel, screw jack, gas cylinders, wash tub, wood basket…we’ll just about everything! Lol…can’t help myself…
Jim M
August 2022
Karl, brilliant idea. I’d love to see the mod.
admin
August 2022
Excellent Ben! Good luck the the NGC.
Robert.G
August 2022
Nice work and good luck !!
BenPopper
September 2022 edited September 2022
Because you all wanted to see it. There is a SWM casting in that picture I swear. Most of what you see was scratch built.

KKarns
September 2022
Wow Ben that’s really well done!
MuddyCreekRR
September 2022
Looking really good…Best of Luck in Tacoma…wish I could be there…
TomMich
September 2022
Nice! Great scene!
brownbr
September 2022
Sweet!
sdrees
September 2022
Very nice Ben I saw it in the contest today at the marrow gauge convention
Karl.A
September 2022 edited September 2022
Worked on some of Brett’s new open mason jars this morning.
Having them mounted on a little ‘build plate’ makes them super easy to work with.
Sprayed with crystal clear on the outside and then brushed some more on the inside to get the clear glass effect.
brownbr said:
Somebody’s going to try filling up one of those mason jars with nails.
kebmo said:
karl, i think the gauntlet has been dropped…
Dropped and picked up Kev…


admin
September 2022
Outstanding! Who wouldn’t want to add a mason jar filled with nails to their shelf?
Karl.A
September 2022 edited September 2022
Thanks bro, a word of warning though,
when putting mason jars full of nails up on the shelf… make sure you don’t drop one,
they make one hell of a mess !!!

TomMich
September 2022
Amazing Karl!!!
brownbr
September 2022
There’s a scene to be modeled.
Karl.A
September 2022 edited September 2022
Thanks Tom,
indeed Bryan, I have it all planned out, and now, thanks to SWSM I have the capability.
SteveF
September 2022
Karl - I continue to be in awe of your modeling skills. I can’t add anything to what has been said, so I will just say, Fabulous! I continue to learn from each and every one of your postings. Thanks for providing the inspiration and the guidance.
Speaking of which, I utilized your ice making guidance and tried adding sea salt to my Pepsi soda machine. It was a good time to work on some of my details. I am spending the holiday weekend at our house in California so the tool shed (in Chicago) is on hold.
I couldn’t get my iPhone to really show the full effect but if I think it came close to what Karl described.

On another subject, my youngest daughter is visiting this weekend. She is a school teacher and joined me on a trip to Michael’s. She needed glitter and we found these small containers for a dollar. I convinced her to transfer the glitter to small plastic bags and I hijacked the containers to help organize the smaller parts in my divided detail parts carrier.


You may be able to find a small container without the glitter but this worked for me and it is has a screw top to keep the parts secure.
ALCO
September 2022
Karl’s mason jar post makes my day! New frontiers!
Karl.A
September 2022
Thanks for the kind words Steve, glad my posts are useful.
Great result on your cooler/machine, it really came out good.
I’m looking forward to doing my O’scale one soon too.
Nice selection of parts you have there to work on.
Karl.A
September 2022 edited September 2022
Thanks so much Alan.
SteveF
September 2022
Ben - Congratulations on your first place MOW award in Seattle! The flanger caboose is such a unique model. Congrats
BenPopper
September 2022
Thanks Steve! It was a fun piece to build
SteveF said:
Ben - Congratulations on your first place MOW award in Seattle! The flanger caboose is such a unique model. Congrats
admin
September 2022 68.185.194.170
Congrats Ben, very well deserved.
EmeryJ
September 2022
Fine looking caboose there Ben. Well deserved. Congrats sir.
KKarns
September 2022
You were right Ben…the SWSM jacket put it over the top! Congrats.
Mountaingoat
September 2022
My friend was at the convention and commented on the flanger caboose. Well done!..Rick
BenPopper
September 2022 edited September 2022
I don’t want to detract from this thread being about the details. I appreciate all the kind words, you can PM me with anything.
Also if you go into my photo stream there are a whole mess of pictures of the modular layout I belong to (Moose Creek Logging Co) as well as Hangman Creek from this past weekend. Both feature Sierra West stuff throughout.
I am going to build something sierra west related soon, I swear. I have a big enough stack of the kits here.
Mike Engler
September 2022
Ben great model in Tacoma. Could have been Best of Show. I’m glad to see Hangman’s Creek was there and I got to see it again. As usual the show stopper! I put in a bid that was unanimously approved to host the 2026 NNGC in the Twin Cities and there is a chance we will be able to see it there as it will be our neighbor.
kebmo
September 2022
fire extinguisher, after paint, before weathering.
this thing is cool.

brownbr
September 2022
Very nice. Great looking wall behind it too.
KKarns
September 2022
Nice! Perfect colors Kevin. Little weathering and another fantastic 3D detail! I’m with Bryan, love the weathered siding.
vietnamseabee
September 2022
Kev… I third Ken and Bryan’s comment….great looking scene all the way around!!!
Terry
TomMich
September 2022
Nice crisp painting on the detail. I agree a little weathering and it will be good to go.
admin
September 2022
Excellent! One of my favorite details.
Karl.A
September 2022
Looks fantastic Kev, the lines and definition between the colours and different components is so clean and crisp.
Can’t wait to see it when you take it to the next step and weather it.
Very nicely done so far.
An awesome detail part to be sure.
Joel
September 2022
The details really make such a difference. great work.
kebmo
September 2022
sorry fellas, i forgot to get a pic of the fire extinguisher so here’s one in situ:

brownbr
September 2022
Bonus points on the safety tag
Karl.A
September 2022 73.2.191.87
brownbr said:
Bonus points on the safety tag
Ditto,
Very nicely done Kevin.
admin
September 2022
Love it, that tag is superb!
kebmo
September 2022
you guys are just being nice…
EmeryJ
September 2022
Totally agree on the tag. Very nice touch.
KKarns
September 2022
Nicely detailed scene Kevin.
kebmo
September 2022
brett’s propane tank is behind the garbage can.
ALCO
September 2022
Detailing of the detail parts! Great idea and great execution!
TomMich
September 2022
Great job Kevin!
SteveF
September 2022
Kevin - I love your detail work on the fire extinguisher. your painting is so precise and the weathered brass looks just right. The label and tag put it on another level. I just painted one for my tool shed but may have to borrow at least your label idea. Well done!! and definitely one of my favorite of Brett’s new 3D details.
kebmo
September 2022
SteveF said:
Kevin - I love your detail work on the fire extinguisher. your painting is so precise and the weathered brass looks just right. The label and tag put it on another level. I just painted one for my tool shed but may have to borrow at least your label idea. Well done!! and definitely one of my favorite of Brett’s new 3D details.
thanks everyone. steve, i googled fire extiguisher labels and found the inspection tag that way.
Joel
September 2022 74.12.101.61
Great little detail I will likely be stealing. Nicely done
kebmo
September 2022
insert thumbs up emoji here _____
glandesjr
September 2022
Man what great work by you guys. I love the Pepsi and Coke machines. You got the colors spot on. And I love the “ice” that Karl has.
randyp
October 2022
I just caught up with this thread. Great fire extinguisher Kevin, as was said inspection tag was inspired. Ben I saw your caboose and voted for it. A wonderful model. Karl what did you use for the nails? fine wire? Also Karl I know I saw your explanation of how you did the shop heater. Thanks Randy
Karl.A
October 2022 edited October 2022
Thanks Randy, the nails are bristles from a wire brush, the shop heater ‘how to’ is here.
ALCO
October 2022
This is a great thread! Really drills down to the nitty gritty “how-to”.
randyp
October 2022
Thanks karl for giving me the link. Randy
CarlLaskey
October 2022
Karl.
How about some screws in a jar or nuts washers Etc…
Karl.A
October 2022
CarlLaskey said:
» show previous quotes
Karl.
How about some screws in a jar or nuts washers Etc…
Some good ideas Carl, I’ll look forward to seeing your results here in the thread.
CarlLaskey
October 2022
I am fresh out of jars.
CarlLaskey
October 2022
Do I know how to kill a thread or what…
kebmo
October 2022 67.184.184.80
CarlLaskey said:
Do I know how to kill a thread or what…
like an assassin…
Karl.A
October 2022 edited November 2022
Portable Air Tank …


HO version next to the O Scale

Stripped down Fordson undergoing a heavy rebuild and some serious maintenance…


(The wheels are on straight, it’s just the camera angles, beautiful piece.)
BenPopper
October 2022 edited October 2022
Fordson in O scale please! (The air tank cart for that matter as well) That looks amazing
vietnamseabee
October 2022
Very nice Karl….you’re a talented modeler for sure….very appreciated that you’re willing to share your talent
Terry
kebmo
October 2022
wow, that tractor looks great!!!
Jim M
October 2022
Beautiful paint jobs Karl. Both the portable pressure tank and the tractor look fantastic and well used.
Joel
October 2022
Up to your usual standards. Incredible! I do wonder if the treads would not be muddy, maybe even with some clumps of old straw. Just a thought.
Karl.A
October 2022
Thanks Ben, Terry, Kev, Jim and Joel, much appreciated.
I considered it Joel, but, as it is being worked on the first thing to do is to hose all the mud off before starting work on it. At least I do.
KKarns
October 2022 173.88.78.186
Tanks are incredible in both fit and finish. The Fordson is a modelers dream and looks so good. You did a wonderful job on it it thus far.
Karl.A
October 2022
Thanks so much Ken, really appreciated.
This tractor will stay as it is, nothing further to add to it.
I look forward to doing a full build of one in the future.
KKarns
October 2022
That’s a nice take to show one under repair like that.
admin
October 2022 68.185.194.170
wow, just wow.
EmeryJ
October 2022
More great detail work Karl.
Karl.A
October 2022 edited October 2022
Thanks so much Ken, Brett and Emery, great to have your inputs and replies.
Plenty more to come as the line from SWSM keeps growing.
I’m looking forward to seeing more of what everyone else is doing with these amazing details.
brownbr
October 2022
Some really neat pieces here.
Robert.G
October 2022
You are doing a fantastic job on those equally fantastic detail parts !!
prsdgt65
October 2022
Karl,
Where did you get resin Fordson? It looks great.
Frank
admin
October 2022
The Fordson is a project still in the dev stages…
prsdgt65
October 2022
admin said:
The Fordson is a project still in the dev stages…
Nice. Looking forward to day it is out of dev stage. ![]()
Frank
Karl.A
October 2022 edited October 2022
I just keep getting blown away…
Brett has a ‘Carpenters tool set’, at least that’s what I’m calling it… ha
It includes a ‘T square’, a ‘Speed/Rafter square’, a ‘Try square’ and a hand saw.
This is the ‘Try square’ from that set… just amazing…


(yes my fingers are overly weathered… hahaha)
TomMich
October 2022
I was inspired by Karl’s portable air tanks. Thought I’d make a portable air compressor. Here’s my HO scale version.


CarlLaskey
October 2022
Neat peace Tom.
admin
October 2022
Very Exciting Announcement!
After six months of work, the partial conversion of the legendary O Scale CHB Sawmill Machinery to 3D Printed parts is now complete. About 35% of the total parts will be shipping in 3D Printed resin, the rest will continue in white metal. I am debuting a wonderful high-end tooling resin as well with these new parts. They’re not brittle at all, in fact they are more versatile and can withstand a lot more abuse than even their white metal counterparts.
The parts I chose to convert include those that were very difficult to cast and low yield, and more importantly those that were difficult for the modeler to work with. Virtually no clean-up or drilling is now required. This is a massive step forward and makes the machinery so much easier to construct.
All orders shipping, starting this week, will include the new parts. Super excited about this. There will be no price increase and if you have a set on order you need do nothing, you will automatically receive these new 3D Printed parts. Eventually I will once again offer the individual machinery but I have no timeframe for that at present. ALSO, look for HO Scale versions next year!
brownbr
November 2022
Well that’s exciting news on the sawmill machinery
admin
November 2022
Thanks Bryan, truly appreciate the comment and your support.
Quote
vietnamseabee
November 2022 edited November 2022
Oh boy….. I guess I’ll start camping out at my mailbox….anytime Brett begins a post with “Very Exciting Announcement “ you know we’re in for a good time!!!
Terry
TomMich
November 2022
Great news! Always moving the hobby forward. Awesome detail parts in metal and resin, 3D parts, now new high end tooling resin. Thanks for continually improving your products.
KKarns
November 2022
What a great time to be a modeler…and what a great place to be modeling…SierraWest Scale Models…bring it!
kebmo
November 2022
cant wait!!!
admin
November 2022 edited November 2022
Thought this illustrated the tooling resin perfectly:

This part is the set lever from the carriage and was one of the hardest to cast in white metal out of the entire sawmill machinery set. This new resin is absolutely amazing as you can see. It springs back to shape instantly btw. I provided feedback to this small company manufacturing this tooling resin and was so pleased with the results they came back with. It’s a true game changer! Blows away anything currently available.
KKarns
November 2022
That’s some serious utility there!
EmeryJ
November 2022
That is very impressive. Very tiny parts not so fragile now. Excellent find on this one!!
admin
November 2022 edited November 2022
yeah, the problem with so many of the “durable” resins on the market is they don’t do a very good job of reproducing fine detail. It’s traditionally been a trade-off. Durability but sacrificing resolution. For me, that eliminated the traditional resins as a resource. These folks combined high resolution capabilities with durability. F A N T A S T I C!
TomMich
November 2022
The future for detail parts looks resilient!
Quote
randyp
November 2022 edited November 2022
Fantastic!! Looking forward to seeing this resin used more. How does it paint? Randy
admin
November 2022
TomMich said:
The future for detail parts looks resilient!
I see what you did there!
admin
November 2022
randyp said:
Fantastic!! Looking forward to seeing this resin used more. How does it paint? Randy
Exactly like my traditional hand-poured resin!
MuddyCreekRR
November 2022
Unreal…Period
Karl.A
November 2022 edited November 2022
Just outstanding,
not only the fact that the sawmill machinery will be available in 3DP at the same quality as the legendary original line, but that the quality of the resin used will provide such a great building experience for the modeller.
Incredible to see that piece so pliable and durable, and crisply detailed.
Very exciting times for the modelling community, I cant wait to build the sawmill machinery,
again, haha
SierraWest, pushing the boundaries further and the possibilities never end.
brownbr
November 2022
Oh my! That solves a lot of problems.
kebmo
November 2022
i can’t wait. what adhesive with this stuff? [you probably know what this is about…]
Joel
November 2022
Amazing. Looking forward to working with this new resin. Very exciting time to be in this hobby.
kebmo
November 2022
i’ve had this detail for a couple of months and honestly, i love it so much i was afraid to tackle it. well i tackled it. i’m not finished with it yet. as i have not applied any powders at all so far. the barrel isn’t glued into the stand, and at this point the only weathering has been a grime wash and an oil wash, and fuel stain from mig.
i primed the casting with flat black. let that cure for a day, and then i painted the barrel with craft paint, burnt sienna. let that cure for a day and then i sponged on cadmium yellow. the stand was primed black and painted tarnished steel.. its had grime wash and and oil wash. i’m going to apply the grime wash to the stand 3 or 4 more times to build it up, and once it dry i’ll hit with a darkish powder . i don’t think rust would be approprate on the stand with all this oil around. i could be wrong about that and could sure use some input.
the barrel was primed black as well. painted acrylic burnt sienna, and then mint green and antique white were sponged on. rust colored powder applied and set with alcohol. after seeing the pics i see i need to remove some powder from the top of barrel.
suggestions welcome.


input please. thanks in advance…
KKarns
November 2022
Great work Kevin. I’m with ya as I have, of late, gravitated away from making things real rusty to more of a used, dirty, greasy/oily, and grungy look. You sound like you’re your own best critic as you have already mentioned toning down the stand with some washes and powders and fine tuning the vertical barrel. Such a great detail, glad you got busy with it!
Karl.A
November 2022
Looks like youve got everything perfectly under control Kev, the drums and frame are excellently done, and thanks so much for sharing your steps with all of us.
The only thing I can suggest is that you start doing my details for me.
Cant wait to see your next steps that you have mentioned doing, very nicely thought out and executed.
admin
November 2022
Love it!
randyp
November 2022
Kevin, maybe a little rust on the back lages away from the oil spout? Is mig a brand of paint that has grime, oil and fuel stain? You also said you sponged on the paint. Did you an actual sponge? No matter what you used for colors or how you applied them you have two great looking details. Randy
Karl.A
November 2022 edited November 2022
kebmo said:
i can’t wait. what adhesive with this stuff? [you probably know what this is about…]
You’ve still got to use epoxy Kevin, I did an experiment with styrene cement and super-glue… didn’t work.
kebmo
November 2022
randyp said:
Kevin, maybe a little rust on the back lages away from the oil spout? Is mig a brand of paint that has grime, oil and fuel stain? You also said you sponged on the paint. Did you an actual sponge? No matter what you used for colors or how you applied them you have two great looking details. Randy
randy,
mig has a pretty big product line of different effects.
i used a make up wedge to apply the paint (and my rouge lol)
kebmo
November 2022
Karl.A said:
» show previous quotes
You’ve still got to use epoxy Kevin, I did an experiment with styrene cement and super-glue… didn’t work.
i’ve resigned myself to the epoxy. i’ll get better at it…
admin
November 2022 edited November 2022
btw - if anyone missed the tutorial on using the makeup wedges Kevin mentioned - that I posted Jan 2022 - here is the forum link. Glad you found the tutorial useful!
admin
November 2022

Working on a large new batch of 3D Printed parts including these amazing Oil High Boys. Two types, the traditional “closed” drain and the in use version with the open drain hatch and oil bottle in place. So very amazing!
EmeryJ
November 2022
Now those are really cool guys. Excellent detail!!
KKarns
November 2022
Those High Boys are incredible! The ability to model them being filled is brilliant.
Joel
November 2022
Just fantastic. It’s all in the details and boy do you produce the best details.
TomMich
November 2022
The detail on the high boys is amazing. Can’t wait to see what new 3D parts come available.
Wes
November 2022
WOW Brett. The level of detailing you are getting with the 3d Printer is insane.
Karl.A
November 2022
Amazing parts and prints, there are going to be some great scenes modelled with the ability to put an empty bottle up there. Story telling at it’s finest, from SierraWest.
prsdgt65
November 2022
Brett,
Love those high boys. Another terrific casting to add to the ever increasing parts.
Frank
Jim M
November 2022 edited November 2022
Love the High Boys. What a great idea to have the ability to put a bottle for filling. Great detail.
randyp
November 2022
Great new parts Brett. I love the finish you achieved. That would be a nice tutorial. Hint Randy
admin
November 2022
randyp
November 2022
That just seams to easy for such wonderful results. Randy
admin
November 2022
Thanks gentlemen, glad you are liking the new oil high boy details.
randyp said:
That just seams to easy for such wonderful results. Randy
It really is a simple technique, the key is layering colors for depth. I am working on some new videos specifically geared for the 3D Printed parts.
brownbr
November 2022
Great job Kevin.
Looking forward to the high boys
kebmo
November 2022
admin said:
Thanks gentlemen, glad you are liking the new oil high boy details.
» show previous quotes
It really is a simple technique, the key is layering colors for depth. I am working on some new videos specifically geared for the 3D Printed parts.
where do you find the time??
kebmo
November 2022
i think this is pretty finished. i intend to put this inside the ltrs near the bates. i might add a second high boy as well. not decided on that yet.


i’m having a little fun with details now. i primed the hand cart with khaki brown, and i’ll let that sit til tomorrow sometime.
i love these 3d details.
speaking of which, i thought of something that would be a cool casting that could actually be applied to every one of brett’s kits; a propane gas tank for heat to sit on the outside of the structure. food for thought.
KKarns
November 2022
Looking good Kev. The stand toned down looks great. Rag is a nice touch will make a great addition to your scene.
Jim M
November 2022
Looks great Kevin. Nice job.
Karl.A
November 2022 edited November 2022
Barrel looks great Kevin and the stand really came out well. as Ken says the rag is a nice oily touch.
Sounds like you’ve got the detail bug, but, Brett’s are hard to resist.
ALCO
November 2022
What will you do if Brett makes 3DP rags?
Karl.A
November 2022
order some… ha
kebmo
November 2022
indeed
TomMich
November 2022
Nice Kevin! That oily rag really adds a finishing touch.
kebmo
November 2022
i couldn’t help myself, i had to tackle the handcart too. unfortunately, as i was removing the pieces from the double sided tape when i primed it, the bottom plate broke. you can see the crack. i’ll hide it with a crate or something when i place on a diorama. i love this detail. if i didn’t know better, i’d swear the wheels would turn.
question for the class:
i primed it a dark brown, then painted the lower steel section with tarnished steel, and then i sponged on a color called wooden deck from a ship building air brush paint set. i think i may have covered too much of the wood color with the powder and washes. whaddya think?

KKarns
November 2022
Nice Kevin!
Karl.A
November 2022
Nope, looks perfect to me.
I’ve started using just regular scotch double sided (for posters/photos, etc) tape for the fragile 3D parts as they are so fragile. It is just strong enough to hold them on a stick.
kebmo
November 2022 edited November 2022
Karl.A said:
Nope, looks perfect to me.
I’ve started using just regular scotch double sided (for posters/photos, etc) tape for the fragile 3D parts as they are so fragile. It is just strong enough to hold them on a stick.
thanks karl.
that’s exactly what i used, and i attempted to pry it up from all 4 sides with a chisel blade. that’s okay, like i said, i’ll stack crates or something on it.
Karl.A
November 2022 edited November 2022
OK good, for your next delicate detail try brushing some clean alcohol around the base of the part, it will dissolve the glue on the tape , just wait a minute for the part to fall off. Hope this helps.
randyp
November 2022
Kevin, I like it. Looks old and weathered to m e. Randy
admin
November 2022
Looks amazing. The new custom tooling resin I am now using for delicate parts will virtually eliminate any breaks like this! Very happy with it. I took several pieces in my backyard and threw them against my brick wall and they didn’t break. A very scientific experiment.
brownbr
November 2022
Nothing else needed in my opinion. You got a great finish on it.
kebmo
November 2022
Karl.A said:
OK good, for your next delicate detail try brushing some clean alcohol around the base of the part, it will dissolve the glue on the tape , just wait a minute for the part to fall off. Hope this helps.
thanks mr. wizard. from now on i’ll do exactly that.
EmeryJ
November 2022
Kevin, add a “weld” to it. Make it look like someone fixed a broken one.
kebmo
November 2022
EmeryJ said:
Kevin, add a “weld” to it. Make it look like someone fixed a broken one.
that’s a clever idea, but it may be above my grade.
TomMich
November 2022
Kevin, hand truck looks GREAT!
MuddyCreekRR
November 2022 edited November 2022
The box idea will work…now…if it were a really heavy box…you could model it as a really heavy box that broke the hand truck…
AlexR
November 2022 edited November 2022
I finally have something to share. I followed Bretts latest tutorial on youtube.


Karl.A
November 2022
Looks fantastic Alex, its an awesome detail, the paint finish is great.
MuddyCreekRR
November 2022
Very nice
admin
November 2022
Excellent execution Alex! The “hose” looks great.
Joel
November 2022
Nice job on the chipped paint Alex. Very convincing.
KKarns
November 2022
Awesome work on that beautiful detail Alex!
CarlLaskey
November 2022
Found this photo at a auto auction.

kebmo
November 2022
i don’t even want to post this after that!
i’ve been having fun with 3d printed details.

i realized that i never modeled a new acetylene tank, so i did.
EmeryJ
November 2022
I think your hi-boy looks just great Kevin. Nice oil over run and everything. Dont sell yourself short sir.
vietnamseabee
November 2022
Looking good Kev
MuddyCreekRR
November 2022
Did I miss the O oil high boy for sale? or is it in a kit?
Quote
kebmokebmo
November 2022 67.184.184.80
thanks emery and terry.
art, it’s one of the new 3d printed details. it’s gorgeous too.
admin
November 2022
It will be available on my website shortly, along with a whole new group of parts.
KKarns
November 2022
Wow Kevin, love the work on the hi-boy, color is perfect and love the subtitle weathering and we’ll used look…well done!
kebmo
November 2022
thanks ken!
AlexR
November 2022
The beginnings of a tractor i’m working on. This is where i left off last bight. Not quite finished yet…


MuddyCreekRR
November 2022
Kool
kebmo
November 2022
nice tractor! that’s gonna look great when finished!
BenPopper
November 2022
Is that fordson gonna be available in the next batch of available stuff? Second time we’ve seen it now…
KKarns
November 2022 edited November 2022
Trust everyone is having a nice holiday thus far.
Brett sent me a couple of 3D printed HOn3 Logging Disconnect kits to work on. These kits went together flawlessly, the detail is just amazing and further illustrates how SWSM 3D Detail Parts are taking fine scale modeling to the next level! Thanks Brett for allowing me the opportunity to work up these wonderful disconnects.

Such beautiful 3D rendered details.

admin
November 2022 edited November 2022
BenPopper said:
Is that fordson gonna be available in the next batch of available stuff? Second time we’ve seen it now…
Yes, it will be available soon in HO and O.
The Disconnects will also be available soon in HO/HOn3 and On3/On30.
Great job on those little gems Ken!
Jim M
November 2022 184.60.89.255
The disconnects are incredible
Karl.A
November 2022 edited November 2022
Great work on the fordson power powerplant Alex.
Terrific work on those little beauties Ken.
MuddyCreekRR
November 2022 75.215.218.139
These new 3D details as Brett says are game changers…they are taking it to the next level for sure…
TomMich
November 2022
Nice work on the tractor. Those disconnects are awesome!
Karl.A
November 2022 edited November 2022
HO version of the picture Carl posted on the previous page.
My first experiment with … Bubbled, peeling, faded red paint.

I dont think my next ones will be quite as ‘junky’ as this one, they’ll be more in use and scene appropriate.
MuddyCreekRR
November 2022
Man…I need one of those for the water tank…looking good
KKarns
November 2022
Thanks Karl and that HO scale oiler looks the part and matches the photo spot on!
admin
November 2022
MuddyCreekRR said:
Man…I need one of those for the water tank…looking good
Going to be available next week as part of a whole new group of 3D Printed details. They will be on my 3D Details page, newest always at the top!
admin
November 2022
Love that HO Scale OHB. Paint and finish are perfect.
brownbr
November 2022
Very nice disconnect Ken.
Same for the highboy Karl.
Jim M
November 2022
Karl, that highboy looks great. Looks exactly like the prototype.
MuddyCreekRR
November 2022
I think AK has some Grime in a jar that would look good on that too…has a wet look to it…
KKarns
November 2022
Brett sent me an example of the wall mounted drill press in HO scale to let me have a go at it. This 3D print is a perfect example of the game changing detail that Brett et.al. have achieved. This is NOT a kit, this was printed in one piece…the detail is mind blowing in HO scale. Even the twist drill bit is just stunning. The new resin Brett is using is extremely durable. I fiddled with this piece for a good while and no damage at all. Next on my bench is an HO scale Hi-boy…

Check out the drill bit…are you kidding me!

Other side of course…sorry for the grungy fingers…straight from the bench!

Better close up of the unbelievable detail in this HO scale one piece 3D printed wall mounted drill press from SWSMs.
Here are some pictures of the HO Scale Hi-boy Brett sent me to to get initial impressions…same wonderful detail as the drill press! This example had the bulk filler cap open and the hose disconnected. Another example has the cap closed and hose connected!

Once again…incredible detail, no breakage or damage whatsoever!


brownbr
November 2022
Very cool.
MuddyCreekRR
November 2022
Utterly mind blowing…not only the 3D parts…your skills…
Karl.A
November 2022
Excellent work on both of those Ken, beautiful finishes.
Mountaingoat
November 2022
Exceptional details…Exceptional paint and weathering…Congrats to both Brett and Ken…Rick
Joel
November 2022
Fantastic details and the finishing is superb!
KKarns
November 2022
I agree Bryan, great subject matter.
Thanks much Art.
Appreciate that Karl.
Thanks Rick, wonderful stuff to work with that’s for sure!
Hi Joel, for sure, they are the finest! Thanks for the note.
kebmo
November 2022
now that we;ve all got your fingerprints on file…
the high boy looks excellent, the drill does too.
you’re awful good at this stuff…
TomMich
November 2022
Very cool Ken! The parts are amazing, and your finishing makes them even more amazing. Can’t wait to be able to get some.
kebmo
November 2022
here’s a horizontal tank (ostensibly to store the gasoline for the gas pump on the pier of the bait shop i just built) that brett was kind enough to send me. this will be sitting either on the ground or a low platform behind the bait shop. this is a resin casting, so what i did was prime it light gray. then i stipple sponged three different shades of gray over that. once that dried i scraped some umber powder and some orange rust powder in healthy portions on each side of the tank, one side at a time. then i doused the powder with alcohol, and when the alcohol spread across the entire side i pressed it in with a paper towel. once the rest of the alcohol evaporated i hit it with a matte varnish spray.
this is also the first wooden barrel i’ve done that i’ve been willing to show. i’ve just never been able to do the bands without making a big mess of it.


vietnamseabee
November 2022
You on top of your game, Kev….nicely done
Terry
Robert.G
November 2022
This is truly amazing. Both the detail and your weathering. As is stated before, a true game changer !!
kebmo
November 2022
thanks terry and robert.
Quote
MuddyCreekRR
November 2022
Damn I love that tank…I had one of those laying around that I can’t seem to find right now…I need a few tanks for my module for gas, diesel, and bunker. There in the shop somewhere. I really like the rust effects, you can see the texture…I can’t get the barrels right either…lol
KKarns
November 2022 edited November 2022
Well done Kevin. Love tanks like that, grungier the better!
brownbr
November 2022
Nice work
Quote
ALCO
November 2022
Top notch! Very realistic.
Quote
kebmo
November 2022 edited November 2022
thanks guys. i envision it being surrounded by weeds and overgrowth alongside a dirt or gravel drive/parking lot
TomMich
November 2022
Very nice Kevin! I especially like the tank and how the rust shadow runs around the perimeter of the tank at the seam.
randyp
November 2022
Alex glad you posted the air tank. I am just ready to do mine with the hand car shed. Yours looks great. I too like the hose. Looks just like it would be wrapped in the real world. Randy
randyp
November 2022
Great work by both Kevin and Ken. Ken nice seeing the close ups of the drill press. I may just work on mine tonight. Randy
Quote
randyp
November 2022
Kevin great job on the rusted gas tank. I am glad you explained how you got the finish. I have one of those in the tool shed and hope to do as good of a job as you did. Randy
KKarns
November 2022
Thanks much Randy. That drill press detail is just fantastic and another home run for the SWSM 3D crew!
Quote
admin
November 2022 edited November 2022
even though the large tank is an older hand-poured resin casting, it still looks awesome!
The barrel looks great as well. I refer to that barrel as “BUB” (beaten up barrel) and was drawn from a prototype pic, crooked bands and all. One of my favorite 3D Printed parts for sure. I am going to film a short video on painting and weathering barrels - super easy.
admin
November 2022
I am working on a pretty good size batch of new 3D Printed details. Everything has to be tested and set up for production in both HO and O scale. I am in the midst of painting and weathering the examples for the store and am filming the process. I am hoping to have a video introducing the Dec 2022 new 3D Printed parts very soon.
kebmo
November 2022
sounds cool.
TomMich
December 2022 edited December 2022
Looking forward to the new 3D details. Can’t have too many details!
MuddyCreekRR
December 2022
Not to complicate matters…with looking at those vintage photos, is it possible to tweek the files you already have to have some oil cans and such with dents and creases? I’ve got a few I’ve “scuffed” myself…but they just don’t quite look as good as I want them to
admin
December 2022
MuddyCreekRR said:
Not to complicate matters…with looking at those vintage photos, is it possible to tweek the files you already have to have some oil cans and such with dents and creases? I’ve got a few I’ve “scuffed” myself…but they just don’t quite look as good as I want them to
That is a great idea and one I have been working on for awhile. It’s actually way more difficult than I thought and thus far am not happy with the results… but will eventually get it. Thanks for the suggestion!
MuddyCreekRR
December 2022
I’ve filed a few dents in a few…they look ok…but without the slight dip down of the top of the container without loosing detail isn’t worth it…I know you if anyone will figure it out…
randyp
December 2022
This is my first post on this thread. One of the great detail parts from the Handcar repair shed is the portable air tank. The air tank has three or four coats of different colors of gray paint over the black base. Dipped in alcohol and then dabbed with a sponge. I the scraped rust colored chalk over the wet alcohol. then lightly brushed from top to bottom. I did just notice that I am going to have to go back and remove a brush hair. Oh, well that is why close up pictures are such a help.


Here is the side with the paint brush hair.

The last picture shows the coiled air hose. It was made with .020 inch thick solder. painted with black rubber colored paint.

I know this detail part has been posted before but I was rather happy with the way it came out. Thanks, Randy
kebmo
December 2022
it looks great randy. the hose is wrapped just right and the tank looks properly beat up.
Quote
Karl.A
December 2022
Looks good Randy, the brass valve and gauge is nice with the white face.
Indeed, close ups are our friend, until we post them, then they bite us, haha
It’s a wonderful detail and your results show it.
Robert.G
December 2022
Well done Randy !!!
randyp
December 2022
Thanks Karl and Robert. Here is that same side of the air tank again.

TomMich
December 2022
Nice work on the air tank.
MuddyCreekRR
December 2022
I like the looks…used…but functional…dig it
admin
December 2022
Excellent job Randy!
randyp
December 2022
Thanks Tom, Art, and Brett for the encouraging comments.
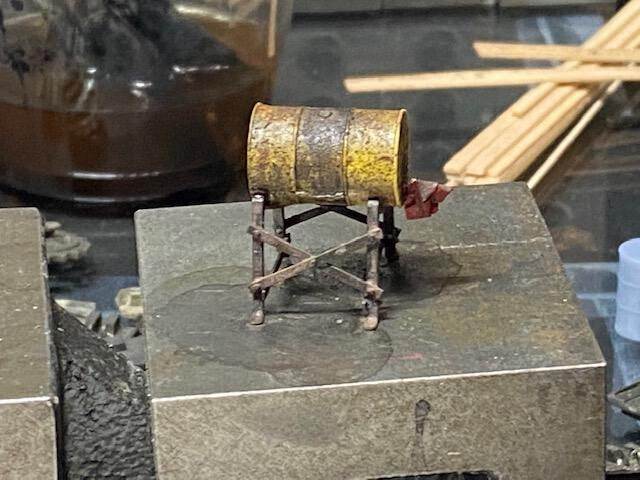
randyp
December 2022
I finished the oil filling drum last night. I had the red and white base coat on the drum and then covered it with light blue. Sponged some off and was not happy with the results. So I went back and sponged off most of the blue. I liked this much better. I then weathered it with an old oil color I had on hand. The stand was painted tarnished steele and then covered with the old oil stain.


I also brushed on some light colored chalk to simulate dust that had settled in the spilled oil. All comments and suggestions are welcomed. Thanks, Randy
kebmo
December 2022
The Disconnects will also be available soon in HO/HOn3 and On3/On30.
Great job on those little gems Ken!
are these new disconnects functional?
kebmo
December 2022
i’ve got some new glasses coming in about another week and a half. i went to an opthalmologist this time, because my last four sets of glasses never really worked for me. this guy promises that i’ll be able to see so much better. he’s gonna get me to 25-20. i’ll take that. then i’ll be able to see the damn hair on randy’s compressor…
randyp
December 2022
Kevin, I understand where you are coming from about your eyes. i had a detached retina about twenty years ago and only see shapes out of my left eye. It is such a pain not having depth perception when adding detail parts.
kebmo
December 2022
randyp said:
Kevin, I understand where you are coming from about your eyes. i had a detached retina about twenty years ago and only see shapes out of my left eye. It is such a pain not having depth perception when adding detail parts.
i have a life long friend that retired this year from fedex after 34 tears. he’s a lost soul with nothing to do. i offered to give him the truck repair and the tools needed to build it (because i have about two of everything) he politely declined saying he had an eye stoke and can only see the bottom half of his field of vision. he jokes about it saying his wife could walk around topless and he wouldn’t even know. so i guess my eyes aren’t as bad as some people’s, but they still make modeling tough. hopefully my new glasses are gonna be a game changer.
randyp
December 2022
You know the old sayin g is true. No matter how bad things are there is always someone that has it worse. Best of luck with your new glasses. Randy