This thread was started in October, 2021
admin
October 2021 edited September 2023 in General News & Ramblings
Had a few minutes to work on the website today and have uploaded a ton of new O Scale Details as well as Re-stocked favorites:
SierraWest Scale Models | 3D Printed Details, Sets, and Kits
As usual these are limited to stock on hand and ship out in a couple days.
Comments
brownbr
October 2021
You are having too much fun with the printer. Details look nice. Gonna need a few of those.
Keep it Rusty
October 2021
Gorgeous new items added to the lineup!
Just LOVE that soda machine.
Joel
October 2021
So many fantastic details. Looking forward to adding them to my modelling. So many possibilities!
TomMich
October 2021
Those 3D printed details are awesome! Can’t wait for them to be offered in HO.
KKarns
October 2021
They are superb and set the standard for what’s possible.
MuddyCreekRR
October 2021
The gas cans are exactly what I needed for a project…
admin
October 2021 edited October 2021
ok HO Scale’ers… it’s your turn.
SierraWest Scale Models | 3D Printed Details, Sets, and Kits
Sending a newsletter out tomorrow so giving you a head start before the new parts sell out…
Keep it Rusty
October 2021
Just love them all. Those soda crates are must haves.
Dave_S
October 2021
Received my O-scale 3D detail parts in the mail today, both the unfinished and finished pieces by Brett. My immediate reaction is, " Its Christmas in October!"
Thanks Brett, just when we think it can’t get any better you hit another grand slam.
Later, Dave S. Tucson, AZ
KKarns
October 2021
Just placed my order and the receipt took up two pages…just a hint as to how many of those wonderful 3D details I absconded with!
Robert.G
October 2021
Greedy boy !!! ![]()
![]()
admin
October 2021
Thank you everyone for the Incredible Response to these new details.
The “Battle Worn” Hand Painted detail groupings sold out in less than two hours, wow! I will have more of these very soon so if you missed out be sure to check back. I will announce the next groups here.
KCSTrains
October 2021
Brett, I think you have found a new niche. If you could just get some oompa loompas to help you paint, weather, and detail, you could make a killing!!!
TomMich
October 2021
Thanks for the nice selection of HO detail parts put my order in. Really looking forward to them.
kebmo
October 2021
holy smokes. less than two hours. that’s really somethin’…
says alot about swsm details.
Pappy
October 2021 edited October 2021
Brett, great details and weathering on these parts. Beautiful!!
I did not purchase because I would rather detail them and give them my signature with painting and weathering and texturing.
Keep up your great work as usual.
Also, keep the kits coming!! ![]()
Mike Engler
October 2021
I’m worried that these new items are way too good. They are dynamite!
TomMich
October 2021
Received my recent order of the new HO printed details. They are exquisite! Really like the pop and beer cases with bottles. Thanks Brett for the great details.
EmeryJ
October 2021
Everyone should get one set by Brett himself. Who ever said I can paint my own Norman Rockwell??
Pappy
October 2021 edited October 2021
I will purchase a few of the weathered and painted versions once the HO version is available and back in stock. And will give my feed back.
The pic’s look fantastic Brett!!
SonofVietnamSeabee
October 2021 edited October 2021
I just received my HO soda bottles and air tanks. Really cool!
Dave_S
October 2021
It is always invigorating to wake up and sign onto the SWSM site and read forum entries but most exciting is to see more 3D details that are available. It keeps me fired up during my morning walk Thanks Brett for Christmas in October!
Later, Dave S. Tucson, AZ
Pappy
October 2021
Just purchased a lot of Brett’s Ho newest parts and should receive this week. ![]()
EmeryJ
October 2021
You guys will love them… I promise.
TomMich
October 2021
I love all the 3D printed details I have received thus far. Can’t wait for more!
Pappy
October 2021
Should be getting another batch this week.
What would be helpful to a lot of people here is paint and weathering suggestions that you folks suggest on these little HO puppy’s.
KKarns
October 2021 edited October 2021
Hey Folks, I have been working on my Eureka Springs Engine House project for some time now, and posting under that build heading. The entire interior detailing was complete at about the same time Brett started coming out with his HO Scale 3D printed detail parts. As a result, I wasn’t able to incorporate many, save a few, in the interior work. However, the exterior work is being worked on now and the addition of the 3D parts is a game changer! As those that have acquired these parts can attest, they are just amazing and so easy to work with. Here are a few of the attributes of these 3D parts that I have found:
Amazing detail not possible in other mediums such as white metal or resin. Obviously this is the number one reason these parts are a game changer as I call them. This is a very important issue with HO scale. many small HO scale parts lose their detail in the casting process just due to the small size…3D printing solves this issue!..game changer is a result!
NO clean up! I’m serious, I have not picked up my #11 blade once when detailing these parts. As an example, the various highly detailed bottles come on a sprue attached at the bottom of the bottles. I will take a sprue and paint all the bottles and then just take fine nippers and cut them off as needed and plant in the scene. They are also printed in a clear “resin” to appear as glass even without a gloss paint or clear gloss color coat like Gallery Glass.
Accept paint and weathering products perfectly.
The parts that would be metal are easily detailed to appear as metal and you can’t tell they aren’t. Here’s a problem we have all had…you detail paint and weather a white metal casting and you use your tweezers to position it in the scene. What happens? invariably a small spot of the base metal glares through from being scratched off by the tweezers or something else. Not an issue with these 3D parts.
One BIG problem…they don’t have the signature SWSM Resin smell!! LOL…I can live with that as I have many resin castings in my castings collection if I need a nostalgic whiff!
Of course Brett is not doing away with resin or white metal as they all have a place in detailing the wonderful kits. Nothing can replace the patina that can be achieved by buffing certain blackened white metal castings.
I will be featuring some of the 3D parts I have detailed and incorporated into my Eureka Springs build here and will give a quick description of how I detailed each one. This will of course be how I do it, not how to do it! To start, below is a picture of part, yes part!, of my current SierraWest Scale Models 3D Printed Parts Collection…

I use these compartmented see through boxes. Big advantage is I can one, see all the parts easily at once and two, carry the box to my diorama bench and study the scene I’m working on with the parts right in front of me…
Next time we’ll get into detailing he parts themselves…Ken
Pappy
October 2021
Thanks Ken!!
Joel
October 2021
Wow Ken. Love the idea. So much to copy from you.
Thanks again.
TomMich
October 2021
Pulling up a chair in the front row! Looking forward to your treatment of these great detail parts.
kebmo
October 2021
this is gonna be great!
Keep it Rusty
October 2021
Great work, Ken. They really are game-changing and I love what you’re doing here.
I have to admit, though, I do love that nostalgic whiff of resin too ![]()
KKarns
October 2021 edited October 2021
The following pictures are brought over from my Eureka Springs build thread, so these are repeats with a bit more description. This way all 3D parts postings are in the 3D Parts thread. Should have put them here to begin with!

Flat Truck Tire. Painted Grimy Black and weathered with pigments. I put a small amount of Epoxy in the bottom inside of the hollow, yes hollow like the real thing!, tire to simulate water collecting inside. This tire must be planted standing upright for full effect.

Screw Jack from the “Screw Jack Mix” collection. One of three screw positions. This one is in the middle. Primed with brown spray paint. Painted with old Polly Scale CP Yellow, screw painted with metallic, and light rust pigments.

Exceptionally detailed gas can from the “Tin Gas Can Mix” collection. Body painted with Model Color (vallejo) gunmetal Grey 70.863, top with Model Color Bronze 70.9989, and weathered with pigments. Final detailing in place with some fuel stains. Brett also has these cans with open top…just wonderful!

Wood barrel from the “Wooden Barrels” collection. Primed with flat black. Painted with roof brown and dry brushed with lighter tones. Ribs highlighted with graphite.

Various wood creates from the “Wooden Crate Mix” collection. Photo has the wood a bit washed out but really shows the detail of these amazing pieces. Treated similar to the wood barrel.
KKarns
October 2021
Sorry for the repeats!..so I finished up a trash can from the Trash Can Open collection. These are one of three categories of HO trash cans! Simply amazing. In addition to Trash Cans Open there are Trash Can Closed, and Trash Can Upside Down…of course I have all three!

Primed with grey spray paint. Weathered with black chalk and some graphite for metal luster…I love these! Will of course fill with trash and have the lid propped up similar to the picture for my scene I’m working on.
Pappy
October 2021
Ken, you are the man!! Fantastic work and many thanks for this!!
KKarns
October 2021
Thanks Pap!
admin
October 2021
Outstanding, I love these shots. let’s see some more! I know there are a lot of these out there!
brownbr
October 2021
You have quite a collection to choose from.
vietnamseabee
October 2021
Karl A has a technique of printing on tissue paper which eliminates the need to sand the paper and due to the nature of the tissue paper the images look aged rather than new
Terry
Pappy
October 2021
Hey Ken, used your Idea to keep all the 3D parts organized.


I have more coming next week and think will be all of Brett’s HO 3D parts for now.
I’m sure Brett has other flavors up his sleeve soon.
Thanks again Ken for the suggestion and all here for your great work and help to others as always.
Pap
KKarns
October 2021
Perfect! Nice touch with the SWSM label on the front…
Pappy
October 2021
You are the man my friend…thanks again for the suggestion.
Now we need a painting video…lol..jk ![]()
admin
October 2021 edited October 2021
Great storage Chris, so many fine details there!
Thanks for sharing!
Pappy
October 2021
Brett, thanks to Ken for his suggestion
KKarns
November 2021
Finished up one of my SWSM 3D Round Gas Cans. The detail here is incredible! Will finish up the detailing on this one with some fuel stains and runs but wanted to show this amazing part before hand.

Close up

Karl.A
November 2021
Sweet !!
KKarns
November 2021
for sure…these detail parts are just amazing. They add so much detail to the already stellar SWSM kits…
sdrees
November 2021
WOW!
MuddyCreekRR
November 2021
You can smell the gas…
brownbr
November 2021
The base metal color is just right. What color did you use?
EmeryJ
November 2021
Those look right nice Ken. I wish I would have made mine that color.
Robert.G
November 2021
Crazy good !!!
TomMich
November 2021
Outstanding!
admin
November 2021
Stunning, what an amazing weathering job.
PaulS
November 2021
Outstanding Ken, as usual,
care to share how you achieved that wonderful, aged patina on the printed gas can ??
asking for a friend …
Be well,
–Paul
KKarns
November 2021 edited November 2021
Me too Muddy!..will add that when it’s planted in the scene so a bit can be running down the side and onto the dirt.
Bryan…the base color?..see my response at the end.
I purposely choose a color of “off red” as it looked weathered to begin with!
Thanks Robert
Appreciate that Tom.
Amazing details Brett! “having a ball detailing them all” Thanks so much.
Thanks Paul and here is the skinny:
- Primed the gas can with brown spray primer.
- Light coat of brushed on Reaper “Ruddy Brown 29830”.
- Handle wire support brushed on Model Color Gunmetal Gray 70.863
- When dry…burnished with an old nasty small detail brush (see pic below) and a bit of graphite. The brush allows you to take off (or more like wear down) as much paint as you want, where you want, and at the same time gives the bare spot a weathered metallic appearance.

KKarns
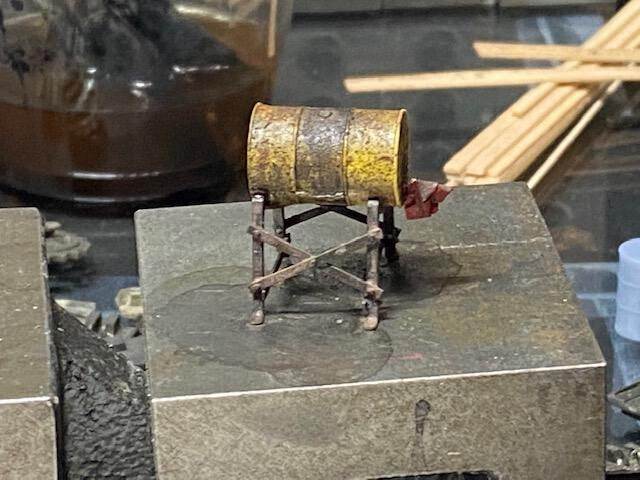
November 2021 edited November 2021
Here is a wood barrel I finished up for Eureka Springs. Brett’s 3D Barrels are by far the best detailed barrels I have ever seen! A joy to work on…
Primed with black spray paint
Dry brushed various wood tones
Brushed on paint for the bands

TomMich
November 2021
Thanks for the explanation. I have a brush that looks a lot like that one!
KKarns
November 2021 edited November 2021
No Problem Tom.
here is a 3D Coffee Mug/Pitcher/Pot that Brett had me mess with…I refuse to detail anything smaller! lol…Done in the vintage blue & white speckled Enamelware.

Out of focus but shows the handle. Could have tried to get a better picture of this angle but…nah…you get the idea.

kebmo
November 2021
me too! it’s just been repurposed;
Karl.A
November 2021 edited November 2021 172.58.142.192
KKarns said:
No Problem Tom.
here is a 3D Coffee Mug/Pitcher/Pot that Brett had me mess with…I refuse to detail anything smaller! lol…Done in the vintage blue & white speckled Enamelware.
Now that just aint right !!!
When I opened my delivery yesterday I thought my coffee mug was a tiny chip I’d broken off from one of the other amazing details until I put my strong glasses on and realised it was actually another separate item, a danged coffee cup to go next to the exquisite coffee pot.
KKarns
November 2021
Any other method to make this would turn out to be an unrecognizable blob! Hollow mug, hollow handle, lip around the top and bottom…are you kidding me!
Karl.A
November 2021 edited November 2021
Yeah you got that right Ken, these are incredible to work with.
I didnt want to copy you so I did mine white with blue speckles and a blue rim.
Also my guy takes his coffee with sugar, so, I gave him a spoon to stir it with.


KKarns
November 2021
Damn…a spoon! Should have thought of that…snooze you lose.lol
EmeryJ
November 2021
I cant believe he actually printed those. Especially in HO. That was supposed to be a joke when I sent that file along with the coffee pot.
EmeryJ
November 2021
Can’t believe you guys actually got that small thing painted so well. Both look great.
Spoon… seriously?? Too funny!!
brownbr
November 2021
Nice. Bonus points on the spoon.
PaulS
November 2021
Yikes, you guys are killing it !!
Ken thanks for the info/technique on the gas can, much appreciated.
And I really like the Reaper Ruddy Brown …
Well I’ll stay tuned as you guys continue to push the envelope.
Thanks again and be well,
–Paul
Pappy
November 2021
Ken great job as usual. You are the man!!
KKarns
November 2021
Pretty cool Emery. I have that mug already glued down to my machine shop porch scene for Eureka Springs!..looks great…once you find it! (Jacket and hat…turned out fat!)
No problem Paul and thanks much.
Appreciate that Pap!
Karl.A
November 2021 edited November 2021
brownbr said:
Nice. Bonus points on the spoon.
Thanks Bryan,
Brett’s details are without question the best, and these are the best of the best.
But, sometimes you’ve just gotta detail the details.
Thanks Emery, Paul and Ken.
Karl.A
November 2021 edited November 2021
I HATE this ‘rough’ (not SWSM) two piece phone in my locoshop (hence the quick, half hearted finish on it) … maybe one day there will be something better and more refined available… just saying… hint, hint…
It’s one of the only three non-SWSM detail parts in that entire build, out of probably a thousand, and more, or so,
but, I wanted it pure SW.

brownbr
November 2021
Bonus points would normally be awarded here for the eraser tips on the pencils and the folded paper. However, since you have stepped up the game with spoons in coffee mugs, bonus points will only be awarded in this scene for a bookmark in a book and/or a feather in the fedora.
KKarns
November 2021
Thanks Bryan…I knew there had to be something that we could point out since I was thoroughly upstaged by the spoon!..yeah, yeah no bookmark and no feather…come on Karl!
kebmo
November 2021
a little bit larger than a cola nut.
juicier too.

vietnamseabee
November 2021
Very nice
Terry
Pappy
November 2021
Excellent Kevin!!..what did you use for the green bottles? Gallery Glass paint?
admin
November 2021
Love it, very convincing.
kebmo
November 2021
Pappy said:
Excellent Kevin!!..what did you use for the green bottles? Gallery Glass paint?
pappy,
it’s tamiya clear green.
terry and brett,
thanks
Pappy
November 2021
Thanks Kevin!
Pappy
November 2021
Just ordered through Amazon…last 2 bottles…thanks again Kevin!
Joel
November 2021
Just fantastic
PaulS
November 2021
kebmo said:
» show previous quotes
pappy,
it’s tamiya clear green.
terry and brett,
thanks
Great job on these Kevin, the clear green sure looks convincing !!
Well done,
–Paul
brownbr
November 2021
Great Job Kevin. You’ll love that product Pap. AK makes something similar but I’ve only used the Tamiya myself
vietnamseabee
November 2021 edited November 2021
Pap… there’s also clear yellow
Terry
Pappy
November 2021
Now will be looking for other clear colors like Coke…don’t start…lol
admin
November 2021
Hah! Chris is going down the rabbit hole now boys!
Karl.A
November 2021 edited November 2021
Yep, mines on order Terry, should be great for those awesome quart oil bottles that Brett has available. Resizing some labels right now in PS for those little beauties.
Ha Brett, the rabbit hole just keeps getting deeper…
Pappy
November 2021
lol!!
Pappy
November 2021
As I said don’t start…lol
Pappy
November 2021
Brett, lol I met someone in the rabbit hole Carla…she was sweet…not..lol
brownbr
November 2021
For Coke and oil bottles I have used either Vallejo or AK “smoke”. Finish with a clear gloss coat.
Pappy
November 2021
Thanks Bryan! and keep up your great work!
Karl.A
November 2021 edited November 2021
Now seriously…
I was planning out a scene I have in mind, so I grabbed one of the amazing 3D steel tubs
from my recent delivery.
I simply sprayed it black and then just damp brushed it with ‘aged steel’.
I figured it would look good with the exquisite detail on the outside rusted up
a little, highlighting the handles, ribs, lip etc, then I did the inside… holy crap !!
The ribs are on the inside too !! , every line to perfection, damn ! this stuffs amazing,
and I’ve still only got a base coat on it.

Who knows where it goes from here…
Pappy
November 2021
looking good Carla!..keep up your great work
brownbr
November 2021
Love the look of that tub.
TomMich
November 2021
Looks GREAT! Perfect color on the bottles.
dick52
November 2021
Beautiful!
Karl.A
November 2021 edited November 2021
Messed around with a set of the beautiful oil bottles this afternoon.
I’m going to need to redo the caps because my tarnished steel
paint was obviously ‘clumpy’… but I was really just playing around
with the ‘new, clear oil’ look. I like how they came out.
The darker pic is more how they look in reality just sitting on the desk,
the lighter pic has a light directed through them and shows the glossy, clarity.


vietnamseabee
November 2021
Great looking bottles, Karl
Terry
Joel
November 2021
Fantastic stuff. Both the 3d printed part and the finishing.
Pappy
November 2021 edited November 2021
Now here is a challenge for you Kevin.
Add labels to your 3D 7up bottles. HO would be more challenging.

EmeryJ
November 2021
Karl, what paint did you use on the oil bottles? I used Tamiya Smoke, but was not quite as happy with them as the look you achieved. Most likely operator error, but thought I would check. Thanks for all the updates. Parts are looking great.
Karl.A
November 2021 edited November 2021
Thank you Emery, I’ll answer shortly.
Better pics coming up, but these for now…


Karl.A
November 2021 edited May 2022
And Bryan, dont even start with me about needing the logo on the top of the caps… hahaha…
Getting two colours cleanly on those tiny caps and keeping the necks clear after colouring the bottles is as far as I’m going to try… for now…
Jerry
November 2021
Beautiful!!
Karl.A
November 2021 edited May 2022
Nothing more beautiful than a set of full Corona’s my friend…
Thank you..
Karl.A
November 2021 edited November 2021
Thanks guys, these new details from Brett (SWSM) are awesome to work(play) with, it’s great to read you all.
Emery,
I used one coat of “Minwax Puritan Pine 218” stain on the beer bottles, and three coats of the same on the oil bottles to get them a little darker and more of a honey/oil color.
I did the oil bottles first as a test. I noticed that the stain wicked up through the details surface and colored much more area than I wanted. Not a problem for the oil bottles. The metal caps would hide that.
However I wanted the necks of the beer bottles to be clear, for me a more prototypical appearance and showing that they weren’t filled all the way to the cap (as they are not in reality). You can see this in the third pic above in my post where the necks of the bottles are clear just above the shoulder, where it should be.
It’s the small things…
Edit: Before the labels were added I gave them a spritz of “Rustoleum Crystal Clear Gloss Enamel” for the ‘glassy’ look.
Have fun !!
Karl.A
November 2021 edited November 2021
Last pics tonight, time for me to go relax.
The beer’s on ice, the barrel is burning and its time to chill.
If only I could find the O scale bottle opener I made !! … oh well,
I’ll make another one tomorrow, until then…
Model Responsibly !!!


Robert.G
November 2021
Very nice !!!
Mike Engler
November 2021
I don’t believe what I am seeing! The Corona bottles show that a genius is at work. How did you reduce the labels to that size?
brownbr
November 2021
Wonderful details and scene.
admin
November 2021
Insanity… Ready for the beach. Like a Corona commercial. Two-tone coloration on the bottle - fantastico!
What did you use for ice, pretty sure I know but will let you tell everyone!
admin
November 2021
and… not to get lost in the beer commercial are the wonderful oil bottles.
admin
November 2021
Any interest in some S Scale details? Get a few requests now and again…
kebmo
November 2021
ice too? holy crap…
brownbr
November 2021
Kind of pedestrian compared to the other work shown here but I do like the valves on the new tanks.

vietnamseabee
November 2021
Not sure what “pedestrian “ means but I sure like the tank….well done br
Terry
Joel
November 2021
Just fantastic work. Up to your old standards I see.
EmeryJ
November 2021
Karl, good ole fashion stain…who would have thought. Great idea.
Agree with the beach scene. You got all the fixins right there.
Bryan, the tank looks perfect. Glad you like the valve.
Keep the ideas coming. Lots and lots of goodies to draw yet.
PaulS
November 2021
Karl, just absolutely wonderful !! And was wondering what you were going to do with that tin bathtub. You put it to great use.
If I were there, I would most assuredly toast your artistry !!
Outstanding,
–Paul
KKarns
November 2021
Crazy good detail modeling going on here! Simply outstanding…
ALCO
November 2021
That’s real ice, right?
TomMich
November 2021
Outstanding detail!
Pappy
November 2021
Love the tank Bryan!. Great color and weathering
Karl.A
November 2021 edited November 2021
Looks great Bryan !!
Thanks for all the comments guys.
Mike the labels were resized in photoshop, they are just under 1/16"wx1/8"h.
Printed on super thin paper (not the tissue) so there are minute/no edges.
As Brett likely guessed… I tried sugar, then salt for the ice, both were too small granules.
I found some coarse sea salt in the cupboard, put some in a bottlecap and sprayed it
with the clear enamel. while still clumpy and sticky I put it into the tub, made
some holes with a tooth pick and then placed the bottles.
You’re welcome here anytime Paul.
Karl.A
November 2021 edited November 2021


kebmo
November 2021
brownbr said:
Great Job Kevin. You’ll love that product Pap. AK makes something similar but I’ve only used the Tamiya myself
and it smells delicious!
Pappy
November 2021
Now Kevin, put the 7up labels on the HO version. O scale much easier ![]()
Karl.A
November 2021 edited November 2021
I’m struggling to get pics fully focused right now, tech issues, the last two pics are OK though.


Drilled out one of the coke bottles, clear coated the INSIDE of the bottle for clarity and added a straw.


Robert.G
November 2021
Insane !!! Never seen details THAT good. !!!
brownbr
November 2021
Dang Karl. Now you’re just toying with us.
kebmo
November 2021
a straw.? what next? alphabet soup?
brownbr
November 2021
One of the empty gas cans here. I’m working on getting the galvanized steel color down. I mixed up a bit of light gray with adamantium and another bit with a lighter silver. sponged them on randomly together. Added a couple rust spots, a bit of dust and some spilled fuel. The only thing missing is the cap dangling from a chain.

Keep it Rusty
November 2021
Remarkable work. Love seeing this level of detail!
TomMich
November 2021
Love all the detail ideas. Straw in the soda bottle in insane!
Joel
November 2021
Karl that gas tank is stupendous. The coke bottles are not too shabby either. Something to aspire to. I guess that’s the point of this website.
kebmo
November 2021 edited November 2021
what did karl use for the straw?
my guess: he plucked a bristle out of his toothbrush.
Pappy
November 2021 edited November 2021
Karl, your work is fantastic and thanks for sharing with all.
Keep up your great work!
Mike Engler
November 2021
I should be happy to struggle as good as Karl. Unreal pal.
Pappy
November 2021
Kevin, now stick a straw in your 7up HO version. May have to use a hair strand ![]()
kebmo
November 2021 edited November 2021
pap,
i plan on using one of my wife’s hairs for fishing line when i install the fishermen on my norton’s diorama.
Karl.A
November 2021 edited November 2021
Thanks for the great comments, Robert, Bryan, Kevin, Rusty, Tom, Joel, Chris and Mike.
So rewarding to read you all and much appreciated.
Love the ‘wet’ look you got on the fuel spills Bryan, so authentic for something in use.
I’m going to enjoy seeing every ones results with these incredible details that SWSM (Brett) is shipping. I’m looking forward to getting and seeing some new ideas from you all as you show your work on these amazing details.
Keep the inspiration coming.
Karl.A
November 2021
Thanks Chris, we’re all here to help and learn from each other.
I’m looking forward to see what others can do with these incredible parts
from Brett/SWSM.
Pappy
November 2021
Agree with that Karl.
I now have all of brett’s 3D HO parts and just going to take my time as I’m currently working on the Scotia Supply build.
Your 3D painted parts are insane!!..
ALCO
November 2021
TMI HA HA. Hope she’s volunteering…LOL
Jim M
November 2021
These pictures make me want to throw everything I’ve ever done in the trash. Amazing stuff. Great work guys.
Pappy
November 2021 edited November 2021
lol Jim..have patience . I started the SW kits 2+ years ago and felt the same way at times.
The great Folks here got me through it and still learning as we all are.
We are all learning each day on this great hobby from all the great folks here.
I still to this day mess up but find a way to fix and ask the folks here for suggestions.
Hang in there and take your time ![]()
Pap
Karl.A
November 2021

brownbr
November 2021
The open ones are incredible.
kebmo
November 2021
holy crap they’re beautiful!
EmeryJ
November 2021
More greatness Karl ![]()
Pappy
November 2021 142.129.137.117
Great work!!
Karl.A
November 2021 edited November 2021
Thank you all.
Those/these are actually more like kegs than full size barrels, the detail as always is amazing.
Having the detail inside the open ones adds a whole new level of detail.
Here are two of them next to Brett’s standard full size O scale resin barrel casting and an old crappy toy HO barrel I found lying around for a size comparison.
So, I guess these can be used as O scale kegs or HO barrels. Either way they are more than fantastic.

I’m looking forward to doing one of the new full size barrels after working up these beauties.
Jerry
November 2021
Mike Engler said:
I don’t believe what I am seeing! The Corona bottles show that a genius is at work. How did you reduce the labels to that size?
His little people are real people so they make the labels for him!!
Jerry
Pappy
November 2021 edited November 2021
Brett, After reviewing the great small details on these 3D parts, have you considered doing 3D door knobs, handles, hinges..etc?
I use very thin wire and bend for door handles on your laser cut wood doors and just thought it would be cool to have these in 3D molds.
No one has these available that I know of.
Just a thought ![]()
Pap
Pappy
November 2021
Love the barrels Karl!!
vietnamseabee
November 2021
Pap…similar to what you use, I use box car grab irons which are pre bent
Terry
Pappy
November 2021
Thanks Terry. HO version as well?
vietnamseabee
November 2021
Yes….Cal Scale I think…I get them at a train store..I’ll get you a pack (down or so) and mail to if you’d like
Terry
Pappy
November 2021
Thanks Terry! very kind of you and appreciate your offer. They have to be HO scale (very small).
admin
November 2021
Thanks to everyone for posting shots of their 3D Printed parts. I know there are a ton more folks with them out there so let’s see what you got!
Oh and Chris - HO Scale door handles and hinges are too small for me to realistically handle. I could print them no problem, it’s the post printing process and processing that is impossible. But great suggestion and thanks my friend!
Pappy
November 2021
Thanks Brett!..had to ask!
Joel
November 2021
Here’s a gas cylinder I’ve been working on.

Karl.A
November 2021
Looks great Joel,
I personally notice the ‘thin’ defined scratches, so hard to get sharp, in scale, and, clear definition on those.
Also, the rust localized only where the paint is missing is beautifully done, also more defined around the shoulder.
Great stuff !!
Jerry
November 2021
Nice detailing Joel!!
Jerry
Pappy
November 2021
Brett, another Idea for your 3D projects.
How about gloves, like welders gloves for an example.
Again, just a thought
PRRJim
November 2021
Pappy: Great idea. I had an opportunity to tour a 120 year old machine shop recently that is still pretty much in its original configuration. I saw the aprons in the attached photo hanging that reminded me of the 3D printed jacket in my second installment of the Brass and Iron Foundry.


PRRJim
November 2021
The shop I visited also had prototype copies of Brett’s barrels.


Pappy
November 2021
Jim, another great Idea for Brett to explore…love it Jim!!
Karl.A
November 2021
Primed and ready to paint…
Time to spend a couple of hours getting some more of these beauties finished, moved over on to the completed tray and ready for action.

Karl.A
November 2021 edited November 2021
Pappy said:
Brett, another Idea for your 3D projects.
How about gloves, like welders gloves for an example.
Again, just a thought
I remember wayyyyy back when I made the brass welder’s helmet for Brett I also made some gloves, (not for Brett, but, just 'cos), those suckers I’d imagine would be way too small/fragile to print, in a production capacity, even in O scale.
Just cut them out of paper.
(a really old pic, 2014)

I do have another idea though in my next post, that may benefit us all… if it’s possible…
Karl.A
November 2021 edited November 2021
After drilling holes in all the amazing 3D details, and then, sticking in all the tooth picks it occured to me…

It would be a great addition to these incredible items to have the hole already there… slightly smaller than a toothpick so you could get a tight fit.
Because, as we all know, every now and then, it get’s a little bit scary drilling a hole with your dremel in something as small as Brett’s oil can,
a pre-printed hole would be sweet !!!

If you want to lay a barrel, drum, acetylene tanks, can, jack stand or any thing else on its side where the base could be seen it would be so much easier to fill in that one hole, than to drill all the others where it won’t be seen.
Pappy
November 2021 edited November 2021
Karl, not a fan of the flat paper gloves. If brett can produce HO scale 3D tiny valves on top of the tanks, I’m sure gloves should be a piece of cake..just saying.
Love the welder shield…this as well should not be a problem in 3D.
I know because I used 3D software (solidworks, pro-E and others) for 25+ years in my profession and now retired.
It all depends on the hardware (Machine) used. Most will use .stp files created by Solidworks, pro-e or others to create the model.
Keep up your great work Karl!
Robert.G
November 2021
That coke bottle is far out… You can actually see the coke ‘bubbeling’ inside the bottle…
Not a bad idea , the pre drilled holes.. If that is possible, I don’t know, not an expert, even a complete dummy on 3D printing… Anyways, great work on all that Karl !!!
Mountaingoat
November 2021
Is the straw hollow? LOL
TomH
November 2021
Amazing work Karl!
Karl.A
November 2021 edited November 2021
Thanks guys, I got a little time to work on the wooden washtub.
Love the detail on this one, the slats are all tapered perfectly and the bands are raised just right. At this point I wouldn’t expect anything else.
Of course, the fact that this exquisite detail is all also on the inside of the tub makes this washtub stunning to see as you work on it, and then look at it when finished.


Karl.A
November 2021 edited December 2021
Now I know I’ve posted some screw jacks before but these are just done, although this is the same basic finishing, however, I wanted to show Brett’s attention to detail… I’m not sure how many styles Brett has, but, these are the four that I have. He’s not happy with just having and producing an awesome screw jack, Brett goes to the next level for us and gives us a variety.

Totally different style on the left with the handle.
- Two in the middle with the screws at different heights.
- On the right no screw, but if you drybrush the inside, the threads are in there.
- Awesome.

He also even puts the handles on different sides for even more variety, some on the left, some on the right !!
Karl.A
November 2021

EmeryJ
November 2021 edited November 2021
Leave it to Karl to find the little “easter eggs” on the screw jacks. I rotated the screws on all 3 of the different heights just a bit so none would have the same grid orientation. I honestly did not think anyone would ever notice that. Good eye sir!
The wash tub looks great, and the wash board is perfect! Hard to tell from the picture, but do the teeny tiny nubs show up on the metal surface? They were drawn zig-zag just like the real thing, but are extremely small.
These little parts have sure been fun working on. Thanks for bringing them to life. That includes everyone.
admin
November 2021
Hah! Great eye there buddy. Ken Karns suggested printing the jacks at different heights. That’s a winner! My birthday today so thanks for all the incredible support!
vietnamseabee
November 2021
Wow…happy birthday, “Boss”
Terry
bpiffero
November 2021
Happy Birthday Brett! I ordered some jack stands on Black Friday, I will have to remember to do the threads. Thanks Karl!
CarlLaskey
November 2021
Have a good one boss.
Karl.A
November 2021
Thanks Emery and Brett.
EmeryJ said:
… Hard to tell from the picture, but do the teeny tiny nubs show up on the metal surface? They were drawn zig-zag just like the real thing, but are extremely small.
These little parts have sure been fun working on…
Little nubs zig zagged on what ??
EmeryJ
November 2021
Metal ribs on the surface of the wash board. Like a real one. If you look at a picture of a vintage wash board, you can see the metal is not smooth, but is rough with alternating bumps. Best I can describe it Karl.
Mountaingoat
November 2021
Happy B Day Brett. Well earned.
Karl.A
November 2021 edited May 2022
EmeryJ said:
Metal ribs on the surface of the wash board. Like a real one. If you look at a picture of a vintage wash board, you can see the metal is not smooth, but is rough with alternating bumps. Best I can describe it Karl.
I scratch built the wash board myself, and yes, the ribs are raised, I used some HO corrugated sheet for the metal part to emulate the ribbing.
I did it as a hint to you and Brett that we needed one. I should have known you guys already had it covered. I’ll look forward to replacing this one with one of Brett’s when I get one.
admin
November 2021
Doing a deep clean and maintenance/calibration on the machines today but will run the wash boards tomorrow!
EmeryJ
November 2021
OOPS!!! We sure did a good job Karl. They look very close to the same sir!
Sorry Brett. I swear it was yours.
MuddyCreekRR
November 2021
Happy Birthday Brett!
MuddyCreekRR
November 2021
I would save myself in shipping if I just ordered all my details at once…but my mind doesn’t seem to work that way…after seeing the round wash tubs…i needed them…lol…along with some more screw jacks…I’m sure next week…I will need more stuff…
Karl.A
November 2021 edited November 2021
Now thats funny Art.
You might as well go ahead and order some gas bottles too…

The top two pictures were before I dulled down the valve handle.
The bottom two are after a little dulling, much better.
Jim M
November 2021
Karl, wow, incredible details and painting. Everything is being raised to a new level here. Love the labels and wonder how you get such good prints. Every time I shrink down an image it just turns to crap when print it out. You must have a high resolution printer.
I worked with many oxygen and CO2 tanks in my career. Lots of times really banged up tanks would get brand new valves so both the before and after dulled down valves, look great in my opinion. Very impressive work.
I need a kick in the butt to get motivated to start modeling again. Maybe this is it.
Keep it Rusty
November 2021
Remarkable. Love seeing this level of detail!
Karl.A
November 2021 edited November 2021
Thanks Jim, it’s just a cheap inkjet printer (HP5525), I remember I bought it about7 years ago because it was cheaper than buying new ink for the printer I already had. I think it was 49.99. The res on these labels is 1200dpi in photoshop, but, I’m not sure if the printer can handle and print that.
The original blue handles on the valves, although as you correctly say is prototypical, it just looked too bright next to everything else, hence I did the slight dulling.
Thanks Rusty and Pappy,
it’s incredible to have parts this defined and detailed to work on and a pleasure to try and show that detail.
Unfortunately, I’m not happy with these labels, they seem too thick and the edges can be seen, also, I know I can do better with the weathering, so, expect to ‘hopefully’ see a ‘new, improved’ version of my work on these one day in the future.
I’ll be working on a wood and stone building for the next few modeling sessions, so, no more detail work for a while, it would be great to see others work on these amazing offerings from Brett.
Post 'em if you’ve got 'em…
Jim M
November 2021
Karl, do you start with high resolution images or do you just do a google search and download what you can find? I don’t have photoshop but I use Gimp which is a free photoshop-like program. I have to admit that I don’t know how to use it properly but it can do everything photoshop can do. I guess I need to spend more time and figure out how to use it better. Lots of Youtube instruction videos but who has time for that?
I understand about the ink being more expensive than the printer. Every time I go to print something out, the ink has dried up and it’s worthless. I now have 2 printers with no ink. Frustrating.
Karl.A
November 2021 edited December 2021
Jim,
I’ll be doing/starting a thread really soon on adding labels to these incredible SWSM detail items.
Brett had asked me to describe/share my process on the forum for others after I did my tiny Corona bottle labels seen previously in the thread.
Rather than go into more in-depth answers to your questions here and thereby detract from the showcasing of Brett’s actual parts…
I’ll open a new thread in a minute for questions and to describe my process on this subject.
Thanks Jim.
Jim M
November 2021
That’s perfect. Thanks
MuddyCreekRR
November 2021
I actually have quite a few…I will be ordering a bunch before April as I’m doing a clinic and need a lot to take care of the students…as for the labels…Brett…I see a new line of labels to go with all these great details…
brownbr
November 2021
Outstanding work on these details.
bpiffero
November 2021
Wow! Amazing work on the details. Looking forward to the thread.
Karl.A
December 2021 edited December 2021
Thanks Jim, Bryan and Ben, I really appreciate the comments.
I was waiting for some shingles to dry for one of the structures I’m working on and couldn’t resist grabbing a different style of acetylene tank that was close by to try on.
The holes on the cap are a great prototypical detail and show up nicely when dry brushed. Yet another small variation to keep things interesting. Also the detail around the collar and shoulder, (which can’t really be seen here), but, I did highlight some of the base detail.

MuddyCreekRR
December 2021
The labels are great…doing some myself…just beware the rivet counters…if you model fairly modern…last 20 years or so…the labels are ok…but back in the 60’s and before…most of that labeling never existed…it was all done with color of the tank…and some with the size and pith of the threads on the outlet…take it from a firefighter that dealt with a lot of haz-mats…we never trusted a label…you had to either taste it…or smell it…(just kidding)
kebmo
December 2021
MuddyCreekRR said:
The labels are great…doing some myself…just beware the rivet counters…if you model fairly modern…last 20 years or so…the labels are ok…but back in the 60’s and before…most of that labeling never existed…it was all done with color of the tank…and some with the size and pith of the threads on the outlet…take it from a firefighter that dealt with a lot of haz-mats…we never trusted a label…you had to either taste it…or smell it…(just kidding)
speaking of smelling it:
right after i got out of the navy i got a job with municipality in their water department. we had 6 or 7 well houses throughout the town. we went to one of them to change out a chlorine bottle, and when my partner opened the door to the room where the chlorine was (i was waiting in the van), he dropped to the ground like a stone. i jumped out of the van to see what happened, andas i neared the building i could smell the chlorine. lucky for him i wore a belt that day. i ripped the belt off, and slung it under his arms and dragged him away from the building.
when the paramedics got there with the ambulance they told me i probably saved his life. i knew chlorine could be dangerous but i didn’t realize how dangerous.
vietnamseabee
December 2021
Well done Kev….quick thinking….if you had still been in the navy I’m sure your actions would have warranted a Silver Star at the least
Terry
brownbr
December 2021
Dang Kevin. Good job. Glad you didn’t get gassed also.
MuddyCreekRR
December 2021
You’re actually lucky you didn’t get overcome either…chlorine is nasty stuff…once you get a good wiff…you may not smell it any more as it actually burns out the sensory spots in your nose…so you would smell nothing…it turns to hydrochloric acid in your lungs and will drown you. Great job geting him out…Chemistry class is dismissed.
Pappy
December 2021
Brett, how about 3D tools. Wrenches, hammers…etc.
Just another thought ![]()
Joel
December 2021
Just catching up here. Amazing details and fantastic finish Karl
Jerry
December 2021
Happy Birthday Brett! Hope you have many more that way you’ll be able to catch up to me!!
Jerry
Joel
December 2021
Just having so much fun with these 3d printed parts. Just a couple of my favourites so far:


Incredible detail, worth spending a bit of time trying to get them “right”
Karl.A
December 2021 edited April 2022
Thanks Joel and outstanding work by yourself, I still just keep staring at the coke bottles, esp the labels…
I know you wanted to show off that awesome galvanised tub, but, I’m really liking that wooden barrel in the background of that pic too.
Great stuff.
kebmo
December 2021
the barrel really caught my eye too. sbs?
brownbr
December 2021
Nice coloring on the galvanized tub.
TomMich
December 2021
All of the parts are Outstanding! Those Coke bottles are Amazing! Really shows what’ possible starting with a quality product.
Karl.A
April 2022 edited April 2022

Joel
April 2022
Wow! Beautiful work Karl.
Jim M
April 2022
Beautiful job Karl
vietnamseabee
April 2022
Holy Smokers….well done
Terry
Karl.A
April 2022 edited April 2022
Thanks Joel, Jim and Terry.
The detail on this detail part is outstanding, wish I could do it justice with the pics, but wanted to post some progress on it anyway so far.
No chalk or air hose now as its final resting place isn’t ready for a while yet and it will get much more handling until then.
(I’m not too happy with the pics from this new phone, but I’ll figure that out.)
I can’t wait to work on the next parts from Brett, amazing stuff !!
Thanks again.
brownbr
April 2022
Those compressors look great.
TomMich
April 2022
Wow Karl! Nice weathering on that compressor.
Karl.A
April 2022
Thanks for the comments Bryan and Tom,
I’m thinking I’ll have this one outside, discarded in the weeds and a newer one inside being used.
brownbr
April 2022
It would look cool if you mounted one on a skid
Karl.A
April 2022 edited May 2022
Indeed Bryan, it definitely looks cool…
I guess that’s why Brett beat us all to the idea back in 2007 …
Brett’s HO Main Street kit… Released 2007

My shameless O Scale copy of his great work in… 2021

Seems to me like Brett is always leading the ‘game’ … and a few steps ahead.
SonofVietnamSeabee
May 2022
Karl, can you tell us what you use for your rust? Those are really great pieces.
Karl.A
May 2022 edited May 2022
Thanks Brian,
The rust on the compressor was done with craft paints… burnt umber, burnt sienna and finally raw sienna for the streaks and lighter areas.
Nothing else yet because it will get more handling, but it will probably get some chalks when it gets closer to the time for placement.
kebmo
May 2022
i love these gas cans.

kebmo
May 2022
a better pic of the same can.

randyp
May 2022
Kevin, great looking gas can. I love the rusted red sides. Randy
KKarns
May 2022
Excellent work Kevin! These detail parts of Bretts are just amazing…
Jim M
May 2022
Beautiful job painting it too.
Karl.A
May 2022
Yup I love 'em too Kev, a wonderful ‘original’ detail and beautifully reproduced by Brett with exquisite detail.
Good work on yours.
KKarns
May 2022
Kevin…make sure you post more of your Excellent detail work these SWSM 3D details, would love to see more.
randyp
May 2022
I yielded to Brett’s set of generic details yesterday. I also ordered the lone side shed. This will give me three small kits. I plan to put the tool shed, the rigging shed, and the line side shed all on one diorama. I will then have fifty extra detail parts for each building from the generic detail set. Kevin keep up the excellent work. Randy
kebmo
May 2022
had i seen karl’s gas can i would have never posted mine. i’ve got a long way to go…
admin
May 2022
Kevin, stop it! We love your modeling and are always happy to see what you’re working on. Post away anytime, you know that!
Karl.A
May 2022 edited May 2022
Hell no Kev, keep posting your great work. We’re all here learning and trying to improve. Sharing is how we all motivate each other, share ideas to get better and learn from one another.
ALCO
May 2022
Looks like a great gas can to me…except it has no dents in it! Gotta carve a chunk out of that thing!
vietnamseabee
May 2022
Kev….your statement tells me you’re both humble and modest….both traits I admire in a person but your modeling work displayed here will stand up to anyone’s….
Terry
kebmo
May 2022
i think i need to learn finesse. everything i do is so ham handed.
TomMich
May 2022
I couldn’t resist trying this. The gas cans are perfect to put a label on. Here are my HO Scale gas cans


KKarns
May 2022
Sweet! Nice work Tom…aren’t those 3D detail parts of Brett’s just a riot to work with.
randyp
May 2022
Is the lettering done with decals? Randy
Karl.A
May 2022
They look great Tom, I especially like the one with the metal top half.
kebmo
May 2022
hard to believe that those are ho gas cans. awesome job. care to do a sbs?
admin
May 2022
Kevin, Tom - what awesome jobs on this simple but oh so common detail. Love it and thanks for sharing. Keep those pics coming!
This small gas can exemplifies why 3D Printed parts are so important. Never could have cast this part effectively in white metal or HPR (hand-poured resin). Also, be sure to ask Emery if he had “fun” drawing that iconic handle! Maybe don’t ask him, cause it wasn’t fun!
brownbr
May 2022
Great job.
EmeryJ
May 2022
It certainly was a challenge. Balance act of reality vs what the printer should be able to do and what it really can do. Trial and error.
Joel
May 2022
Great little detail. Love the labels.
TomMich
May 2022
Thanks all for the comments. Ever since purchasing these 3D printed details I have wanted to put a label on the gas can. I thought it was a natural. Randy, I just made the label in a WORD doc. and printed it out on regular paper. Sanded it as thin as possible, painted the edges of the paper red and glued in on the can. Then weathered with chalk.
Thanks Emery and Brett for creating such fine details. They are fun to work with!
Karl.A
June 2022 edited June 2022
It’s been a while since these masterpieces produced by Brett and SWSM have been shown, so, on Monday I got my delivery of a beautiful batch of HO scale details.

I’ve had the pleasure of working on some of the O Scale parts previously, this is my first time seeing the HO details and they are just as incredible, but smaller.
Tonight was the first chance I got to examine them closely and paint them up.
I got them all prepped and primed after work today and then had to choose my first victim/attempt.


I decided on the HO compressor as I had just recently completed the O scale version.
It’s incredible to me that the HO version has all the exact same details that I can see as the O scale version.
Everything is perfectly reproduced and the only difference I could see was the size… absolutely amazing and of course, being that it is SierraWest, the quality is perfect.


I’m real happy with it for my first return to HO for several years, I managed to paint in the gauge, and the brass pipe on the valve, so, I’m good with that result.
Maybe a ‘little’ too rusty for a working unit, but, I also have the more modern version ready to do next which will be the replacement for this one and shown as more oily, maintained and still in use than this one.
Now I’m looking through the HO selection in front of me and deciding which one(s) to do tomorrow…
vietnamseabee
June 2022
Nice….very nice…..holy smokers!!!
Terry
Karl.A
June 2022 edited June 2022
Thanks Terry,
looking at the pics after I posted I realized I missed posting this one which shows the size of these amazing parts.

I also realized that I neglected to put the ‘orange/new/rusty water’ streaks on the HO version, I’ll have to fix that, but it can wait until tomorrow.
Jim M
June 2022
Amazing.
kebmo
June 2022
wow, what a great little detail that is.
admin
June 2022
Simply Fantastic! Hard to imagine the detail and weathering in such a small part.
TomMich
June 2022
The 3D detail parts are amazing and can’t wait to see what will be produced next. I have worked with some and really enjoy the detail they have.
KKarns
June 2022
For those of us that work in 1:87, the 3D parts Brett produces are a game changer make no mistake. SierraWest kits are to craftsman kit modeling as Brett’s 3D parts are to other detail parts…no comparison, no compromise, and no reason not to have a drawer full!
Karl.A
June 2022
Thanks Jim, Kev, Brett and Tom, great to read your replies.
Just home from work so, it’s time to relax a little and then decide which ones to work on next tonight.
KKarns
June 2022
I totally agree Tom, those 3D parts are amazing. Glad to hear you’ve had a chance to work some up and you’re right the filigree of the parts is stellar.
Karl.A
June 2022
HO Scale Screw Jacks … freaking awesome…


Jerry
June 2022
Well it’s tomorrow I want my orange/new/rusty water streaks!!
Great eye for detailing and the coloring perfect as usual.
Jerry
Karl.A
June 2022
Jerry said:
Well it’s tomorrow I want my orange/new/rusty water streaks!!
Great eye for detailing and the coloring perfect as usual.
Jerry
Thanks Jerry… !!!


Thats all I’ve got for you right now my friend. Sorry for the delay, haha.
TomMich
June 2022
Karl. I’m surprised to see you working with HO Scale parts. Regardless of the scale the 3D parts are simply AWESOME! Can’t wait to see what comes out next.
Joel
June 2022
Wow what an incredible paint job. Just spot on. Love the dial too.
Karl.A
June 2022 edited June 2022
Thanks so much Tom, I do actually work with Brett’s HO details quite more often than I realized.
With this new incredible line of HO details I see myself working with them even more in the future.
Great to read you Joel, thanks so much for those kind words.
Here are a few of the HO acetylene/gas bottles I just worked on tonight.
Amazing parts …


PaulS
June 2022
Just fantastic Karl, in both scales. The 3D printed castings are works of art themselves and your painting / weathering brings them to their fullest potential. All are extremely well done and love the gas bottles with the chipped paint, brass valves and knobs.
Thanks for sharing Karl and be well,
–Paul
TomMich
June 2022
Having fun with some of the 3Ddetails.


Mine aren’t quite as rusty as Karl’s. I take better care of mine, except when I break the bend in the little pipe running down from the top of the motor.


Did a copper fire extinguisher just for fun. The labels are from photos of real fire extinguishers. Too small to see any detail, just wanted to add the affect of a label.

EmeryJ
June 2022
All you guys are doing a great job bringing these to life. Thank you for sharing. It is a real pleasure seeing all of them!
KKarns
June 2022
Oil bottles are really nice Tom! as are all those details…tubs with the junk are really well done.
TomMich
June 2022
Thanks guys It’s fun for me working with these. I love the accuracy and detail of them. Here are some of the boxes I did as well. Emery as I understand it’s your collaboration working with Brett to bring them to fruition. Thank you. Keep them coming!

Karl.A
June 2022 edited June 2022
What a great collection of beautifully finished details Tom.
Really excellent work on all of those.
Fire extinguishers look really great, I’ve got some here and I’m looking forward to trying some of those.
Everything else is very well done, so glad to have you joining in the thread with your wonderful work.
Thanks for sharing . Looking forward to more people joining in with us.
Jim M
June 2022
Fantastic job Tom. Those details are amazing and your painting job just adds to them.
kebmo
June 2022
KKarns said:
Oil bottles are really nice Tom! as are all those details…tubs with the junk are really well done.
i thought they were miller high life bottles…
KKarns
June 2022
Oh crap! I think you’re right Kevin!
TomMich
June 2022
Not so great taste, but less filling!
BenPopper
June 2022
Question: In the “O Scale Truck Repair 3D Printed set” there are old wooden style automotive batteries. Could one of those batteries been feasibly used to power a single or possibly two lightbulbs in a railcar?
Joel
June 2022
Tom, great job on the details. I really like the crate of bottles and the tubs of junk.
TomMich
June 2022
Thanks Joel. I enjoy working with detail parts, and these are among the best in the industry. Can’t wait to see what Brett comes out with next.
glandesjr
August 2022
Hey Tom, these are awesome. How do you get the translucent look on the Miller Lite bottles?
Robert.G
August 2022
No denying, great work on super details !!
TomMich
August 2022 edited August 2022
I used to do leather work. I have some leather dye left over. I just dipped the bottle casting in a brown leather dye. Wasn’t sure of it would work but pleased with the result. Then painted the caps.
I have ordered some of the new 3D oil bottles and am looking forward to seeing if the result is the same on these new bottles. They have a shine on them, which looks like glass, whereas the previous bottles had some “tooth” and accepted the dye well. We’ll see what happens.
TomMich
August 2022 edited August 2022
Some new 3D details arrived today. I couldn’t wait to do the oil bottles and racks.


On a previous post I had some oil bottles that I had dipped in a brown leather dye. I thought they were too orange. This time I dipped them in a mix of brown and black dye. For the bottles without caps I dipped them in the brown/black dye then in clear alcohol. This I thought gave a better empty bottle look. The leather dye is an alcohol base.
KKarns
August 2022
Wonderful job Tom. Your coloring of the bottles is really nicely done. I just received my parts order for the same details. The filigree of the parts is amazing and those thin, to scale, handles on the bottle racks are ridiculous. I got some gorgeous wagon wheels as well…Packaging for these parts is wonderful, nicely done once again SierraWest!
SteveF
August 2022
Tom - Looks like there is oil in those bottles! You’ve really hit upon that translucent beige/bronze quality of new motor oil. Nice work. The combination of the painted racks and oil filled bottles is a real attention grabber. These new 3D parts from Brett are raising the bar in what can be accomplished with modeling. Can’t wait to receive mine.
Robert.G
August 2022
Great results !!
kebmo
August 2022
i just received a small order from brett. holy shit. i got the oil drum and stand, and some oil bottles because i liked the scene on the watertower diorama and wanted the ability to duplicate it sometime. the details are incredible. i was almost afraid to touch it it’s looks so delicate. i also got some oil bottles and the rack, wow. looks like it was made by a spider. i can’t wait to try detailing them.
admin
August 2022
kebmo said:
looks like it was made by a spider
Now that’s funny. Enjoy them. The parts just keep getting better and better! Very excited.
KKarns
August 2022
Starting to experiment with my newly acquired oil bottles. This is my first go at a half full bottle. Picture isn’t great and I’ll be working on that. Such a nice detail.

Jim M
August 2022
Holy crap. Great job there.
KKarns
August 2022
Thanks Jim…Here’s one with the bottle tipped…
Sorry…didn’t mention scale in the last pic, its HO scale.

MuddyCreekRR
August 2022
What are you using for the oil?
admin
August 2022
Jim M said:
Holy crap. Great job there.
agreed! superb!
kebmo
August 2022
MuddyCreekRR said:
What are you using for the oil?
inquiring minds wanna know…
Robert.G
August 2022
SUPER !!!
CarlLaskey
August 2022
KKarns said:
Hey Folks, I have been working on my Eureka Springs Engine House project for some time now, and posting under that build heading. The entire interior detailing was complete at about the same time Brett started coming out with his HO Scale 3D printed detail parts. As a result, I wasn’t able to incorporate many, save a few, in the interior work. However, the exterior work is being worked on now and the addition of the 3D parts is a game changer! As those that have acquired these parts can attest, they are just amazing and so easy to work with. Here are a few of the attributes of these 3D parts that I have found:
Amazing detail not possible in other mediums such as white metal or resin. Obviously this is the number one reason these parts are a game changer as I call them. This is a very important issue with HO scale. many small HO scale parts lose their detail in the casting process just due to the small size…3D printing solves this issue!..game changer is a result!
NO clean up! I’m serious, I have not picked up my #11 blade once when detailing these parts. As an example, the various highly detailed bottles come on a sprue attached at the bottom of the bottles. I will take a sprue and paint all the bottles and then just take fine nippers and cut them off as needed and plant in the scene. They are also printed in a clear “resin” to appear as glass even without a gloss paint or clear gloss color coat like Gallery Glass.
Accept paint and weathering products perfectly.
The parts that would be metal are easily detailed to appear as metal and you can’t tell they aren’t. Here’s a problem we have all had…you detail paint and weather a white metal casting and you use your tweezers to position it in the scene. What happens? invariably a small spot of the base metal glares through from being scratched off by the tweezers or something else. Not an issue with these 3D parts.
One BIG problem…they don’t have the signature SWSM Resin smell!! LOL…I can live with that as I have many resin castings in my castings collection if I need a nostalgic whiff!
Of course Brett is not doing away with resin or white metal as they all have a place in detailing the wonderful kits. Nothing can replace the patina that can be achieved by buffing certain blackened white metal castings.
I will be featuring some of the 3D parts I have detailed and incorporated into my Eureka Springs build here and will give a quick description of how I detailed each one. This will of course be how I do it, not how to do it! To start, below is a picture of part, yes part!, of my current SierraWest Scale Models 3D Printed Parts Collection…
I use these compartmented see through boxes. Big advantage is I can one, see all the parts easily at once and two, carry the box to my diorama bench and study the scene I’m working on with the parts right in front of me…
Next time we’ll get into detailing he parts themselves…Ken
Ken what a good idea I have the same system altho I am on a budget.