Robert started this thread in September, 2020
Robert.G
September 2020 in O Scale Builds
I found this a nice kit ( they all are), not to big, to work on after the mega Sawmill Project. The only problem, the kit isn’t around anymore and so far not on ebay since as long as I am searching for it. So, what does one do in that case…
Build it anyway. It didn’t look to complicated so I was able to figure out what was the frame of the walls, or at least what could have been the design of them. I used the photos from the website to get going. ( just personal use !!!)
What the castings are concerned, I have the casting sets 1 and 2 which will provide enough to fill this one. Also leftovers from all the kits build already. There are so many in all the kits. They will come in handy now.
For the rest I’ll improvise a bit , but it will be a nice build. I will probably change a bit here and there and give it a personal touch.
So, of we go… ![]()
For now, I made all the wall frames…
to be continued..

Comments
Mountaingoat
September 2020
Back to the basics. Build it one stick at a time. A great start Robert. This will be fun to follow since you don’t have the kit, only photos for reference…Rick
TomMich
September 2020
Great start Robert! I look forward to your build and what you are going to do about windows. SW laser cut windows have great detail and are relatively easy to build.
admin
September 2020
Lots of fun here. Looking forward to your build.
Joel
September 2020
Always looking forward to seeing more of your work.
kebmo
September 2020
count me in too.
Robert.G
September 2020
Ok, this is what I did. First, I didn’t weather the wood because I wanted to try something else. It’s gonna be a weathered, painted shed. That’s all I know now. We’ll see what’s gonna come. A little experimenting with this build.
The frames were painted, but that was before I decided to paint everything.
The windows are made with very tiny pieces of scale lumber that I cut. I glued these on to mm paper to keep everything square. Then I prepared the glass which comes from a blister package. I sanded the surface to get rid of the shine and to get the glue stick better. Superglue that is.
I altered the dimensions. The shed turned out bigger, a bit higher, three windows at the back… For now. I don’t know yet what I will do with the roof. Exciting…not?


soon more.. ![]()
Mountaingoat
September 2020
The windows are fantastic. I am anxious to see how you approach the weathered paint and the results. Knowing your work, I suspect it will be impressive…Rick
brownbr
September 2020
Very nice. The door latch is a welcome touch.
For the roofs, I’d say tar paper or corrugated. Maybe both if you want the leaning addition to look like it was added later.
admin
September 2020
Windows look great. What are your thoughts on staining the siding and battens after they have been glued to the frame vs. before?
kebmo
September 2020
i was wondering that as well, and also, how will you paint mullions and muntins?
Robert.G
September 2020
I make a difference between staining and weathering. The staining, or coloring with a transparant color, which leaves the wood visible, is best done before glueing. Glue that oozed out, doesn’t take stain. Only paint. Now, for this build I was gonna paint it anyway, so in this case it doesn’t really matter. But I would recommend , like the manuals suggest, to stain before glueing.
On the other hand, the weathering part, that is the chalk treatment, I sometimes experienced,that the tiny bits of white glue we use, don’t always adhere to the chalk, if there is to much of chalk. It loosens sometimes. When I glued a weathered board, I clean the glue that oozed out with some water, but that even diludes the glue more and weakens the adherence. Well not always of course. It is a fine line…
I always do an extra chalk weathering when a wall is finished. Even with sandpaper, xacto knife ,I hit the surfaces when I think there is to much of chalk, stain or other weathering substances on them.
Weathering is a proces of several treatments. It never comes out of one single can or tube.
I am sure, there are as many ways as there are modelers, and every one has his methods.
Like I said in the intro of the build, I will experiment somewhat with methods. I will share with you my findings of course. And if this can set your minds at peace, I do skrew up sometimes… ![]()
Robert.G
October 2020
Here’s an impression of what the walls will look like. This is the double shed gate.


Robert.G
October 2020
in close up,

Mountaingoat
October 2020
Your modeling is always superb. Absolutely incredible…Rick
sdrees
October 2020
Ed said it. Can you explain your process that you used in these photo’s? Thanks
Robert.G
October 2020 edited October
Another wall. With explanations…
After the gluing of the boards, I stained the wall with gray alcohol based aniline . ( that’s a powder used in restoration of furniture and artworks) but the AI is just as good.
Then a first coat of mat light grey Humbrol lacquer paint. When dry ,after two days, a second coat of mat cream color. The same type of paint.
When completely cured, I used cellulose thinner as a paint stripper. ( do this outside , the fumes, although very little, might irritate you). Depending how much and where you want the paint to be stripped, apply the cell. with a brush and let it flow from top to bottom.
Let dry. During the drying ,the paint will start to wrinkle . When dry, you can brush the surface and wipe away the paint. Repeat if necessary , but this is a fairly aggressive way, so don’t flood the thing.
Then I gave accents with water soluble color pencils.
Then a wash with Ed’s favorite, very diluted Bitume de Judea. ![]()
And to finish , a little bit of pigments , or chalk if you like here and there.
At this stage, it’s enough. When all the walls are put together, some more local weathering will. be done.


vietnamseabee
October 2020 71.219.130.52
Looking good, Robert…thanks for the step by step process
Terry
Mountaingoat
October 2020
Yet another technique with fantastic results. That really looks great…Rick
admin
October 2020
Fantastic results!
brownbr
October 2020
Very nice.
TomMich
October 2020
Great peeling paint effect! Thanks for sharing your processes.
Joel
October 2020
Just beautiful, as always.
KCSTrains
October 2020
Thanks for sharing the process. Phil
sdrees
October 2020
Thanks Robert. Looks great.
kebmo
October 2020
-amazing results. i’m in awe…
sdrees
October 2020
Robert,
What is the equivalent of cellulose thinner in the US?
Robert.G
October 2020
It’s the solvent that diludes for example car laquers, I Wouldn’t know the proper English word.
Robert.G
October 2020
Here’s where I am now. The big space has a concrete floor, the smaller a wooden one. Not that much will be seen, but hey, I might just as well go the distance. ![]()
Now I can start thinking what I’m gonna do with the roof. I need to make a truss , that’s for sure.
Since I made the building longer the the original, and the two doors are open, so you can look inside.


soon more ![]()
sdrees
October 2020
the peeling paint look is fantastic
admin
October 2020
Simply fantastic!
Lynn_Boyd
October 2020
Very nice work.
Robert.G
October 2020 edited October 2020
engine909 said:
You shook me all night long. .
AC - DC Ed, lots of energy from that band.
Thanks guys.
KCSTrains
October 2020
That’s the way peeled paint is done. Great job. Phil
TomH
October 2020
Masterful, as always!
kebmo
October 2020 76.16.128.187
indeed
Robert.G
October 2020
Whilst working on the roof, I also made some new details. Remember, no castings in my ’ kit’… ![]()
A set of wooden , army style crates. ( O,7 inches long )


soon more..
kebmo
October 2020
wow. maybe brett should hire you.
kebmo
October 2020
yeah that’s crazy small.
vietnamseabee
October 2020
I read it as O scale comma 7 inches long
Terry
kebmo
October 2020
might be. i read it as 7 tenths of an inch. my bad…
Robert.G
October 2020
18 millimetres, do the conversion… 0,7 inch..
EricMG
October 2020
Lovely. But after WAY to many years of breathing chemicals, I simply cannot go near them, mask or no mask.
brownbr
October 2020
those will do in a pinch
Robert.G
October 2020
More progress.
A nice detail, I think , the ladder hung up on the rear wall.
The interior ready to be ‘decorated’… Send in the guys with the pink trousers…![]()
And the tarpaper roof of the annex. … Had it’s best time so to see. ![]()


next episode … soon.
KCSTrains
October 2020
Robert, very nice work. I love the shed roof. The moss is a nice touch. Phil
vietnamseabee
October 2020 edited October 2020
The moss is a hit with me as well and the ladder and, and,and…oh, I just like it all…been lookin’ for something to criticize but haven’t found anything yet…but I’ll keep lookin’
Terry
brownbr
October 2020
I always enjoy your roofs.
Robert.G
October 2020
I did some more ‘furniture’ for the shed. A carpenter’s tool case with metal handles, , and a large cabinet with shelves and paneled doors. To be closed with a key. ( Not provided because lost by the nonchalance of the workers… ![]() )
)
I put a Buffalo Landing figure next to the tool chest so you can see the proportions.
Both the chest and cabinet need to be filled with …euh…tools and stuff. That’s for later.
I also tried to make this furniture with wood with the correct scale of thickness of the stock. Therefore I sanded down even the thinnest pieces of stripwood.
I also have the feeling that the resin furniture is always a bit thick. But perhaps that’s because the casting proces doesn’t allow very thin results. This doesn’t do anything on the quality of the castings. Best ever !


![]()
brownbr
October 2020
Love the furniture
KCSTrains
October 2020
Very nice work. Because of your photography, you don’t realize how small it really is. Phil
kebmo
October 2020
[phew…]
sdrees
October 2020
Amazing
TomH
October 2020
Wow
Speechless
TomMich
October 2020
Great details! Thinning down the thickness of the wood really adds to the reality.
Robert.G
October 2020
So, more details were made. I have to fill the shed, right…A wooden rack


to store gas containers ( made of bits and pieces…)


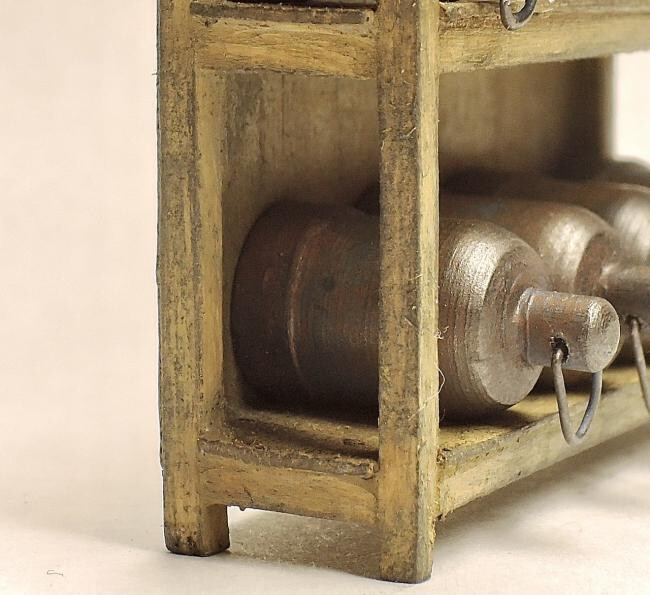
A real, professional beechwood workbench. ( just like the one on my workshop) Anybody knows what the hole in the top is for.. ![]()


and another type of trestles. ( also from my workshop)


![]()
dick52
October 2020
Supurb!
KCSTrains
October 2020
Unbelievable and awesome work every time. You are the master at this!!! Phil
Mountaingoat
October 2020
I have no idea how you get the results you do. I cannot imagine this level of detail from scratch. Phenomenal…Rick
vietnamseabee
October 2020
A joy to view your skills
Terry
EmeryJ
October 2020
The hole is for a bench dog clamp. Or at least that is why I have one in mine.
tomw
October 2020
Holdfast.
kebmo
October 2020
so this rabbi walks into a bar…
Robert.G
October 2020 edited October 2020
A cigar for Emeryl and Tom… ![]()
Go on Kevin, nothing worse than a joke without the clue… ![]()
SteveCuster
October 2020
Details look fantastic Robert! Very cool.
brownbr
October 2020
A true master craftsman’s work right here.
My answer for the hole in the bench: That’s where the water would drain as I washed it down after slicing off my fingertip.
TomMich
October 2020 108.
Great details. I love the fact that you use “bits and pieces” to make details like the gas bottles. I try to find uses for “bits and pieces” lying around.
TomH
October 2020
Amazing work Robert. Hard to believe it’s not full scale!
KKarns
October 2020
It’s all in the details!..
Joel
October 2020
Fantastic attention to detail. Just beautiful, not surprising but still amazing.
Robert.G
November 2020
So here it is, the SW kit without the kit. What a build that was. Starting for the unknown with only some photos as a guide. I just made my own interpretation of it. Made a bunch of details, added some leftovers from previous kits, and there you go.
As you will see, there is no track because I’ll install that later when it has it’s place on the layout. I believe it is easier to lay a continuous track in front of the buildings than puzzle all the short pieces of track that are on the dioramas together.
There is also less clutter and junk on this diorama because I feel not all dioramas with SW builds should look like a junkyard..
When it get dark, I’ll make some pics of the lights in the shed.
Enjoy the photos and I hope you like them. ![]()


Thanks for watching…
Robert.G will return… ![]()
brownbr
November 2020
Another masterpiece. And in record time.
Mountaingoat
November 2020
Fantastic as always. You are a true master…Rick
tomw
November 2020
Well done!
sdrees
November 2020
Well Robert, what can I say, If I didn’t know it, I would say that this was 1 to 1 scale which you have heard many times. The peeling paint effect is just great and all the other details are right on. WOW!!!
vietnamseabee
November 2020
Robert…growing up in America we had a word we used when something was very good…believe it or not the word was “bad”…as in “ that corvette is so bad”… well this build of yours is so “bad”…well done buddy
Terry
KCSTrains
November 2020
Robert, just amazing. It really doesn’t look like a model. I just loved your interpretation of this great model. Congratulations. Phil
TomMich
November 2020
Amazing Robert! Looks so natural and blends in so well with the background. Can’t tell where the diorama ends and the real background begins. A real testament to your wonderful work. Thanks for sharing.
EricMG
November 2020
Ring a bell!
PainTrain
November 2020
You absolutely killed it on that diorama base. Really liking the dirt driveway. Excellent job.
TomH
November 2020
Reality captured
Incredible!
jmanugo
November 2020
I really like Robert.
Greetings.
JM
kebmo
November 2020
holy crap.
KKarns
November 2020
Crazy good!
admin
November 2020 edited November 2020
Simply outstanding. The peeling paint and chipping is second to none. It is so incredibly natural and effortless appearing. It is amazing how realistic everything appears. Robert sent me some high res pics for the gallery and let me tell you when you zoom in the detail is unbelievable. Thank you as always for taking the time to share your work and techniques with us.
kebmo
November 2020
unbelievably good.
Robert.G
November 2020 edited November 2020
Things to discover… In the first and eleventh photo, you can see a wooden barrel. Next to it on the left on the ground is an old cooking pot. When you zoom into that you will see the reflection of the wall in the water that is in that pot… If anyone would like some high definition photos, send me a message with your email. I will Wetransfer them to you . More to discover that way… ![]()
kebmo
November 2020
I could be Cousin Eddie.
Oh, Eddie… If I woke up tomorrow with my head sewn to the carpet, I wouldn’t be more surprised than I am now.
Dave_S
November 2020
Robert,
Thank you for sharing the WeTransfers. They are super. Your generosity since joining the group a few years ago ( July 2017) has been extensive and greatly appreciated
Later, Dave S. Tucson, AZ
Dave_S
November 2020
I took Robert up on his suggestion to enlarge the small water trough in the high resolution photos he sent via WeTransfer to better see the reflections in the water. Here are the amazing results from my cropped photos of Robert’s high resolution photos.

Later, Dave S. Tucson, AZ
Dave_S
November 2020
Crop Resize 2.

KCSTrains
November 2020
The reflection in the water is impressive. Your split wood is also very impressive. Phil
Dave_S
November 2020 edited November 2020
Crop Resize Photo 3.

Dave_S
November 2020 edited November 2020
Phil,
These are Robert’s high res photos that I cropped, resized and posted. All the creative work was done by Robert.
Later, Dave S.
admin
November 2020
That’s pretty darn impressive…
brownbr
November 2020
Still can’t get over the peeling paint
kebmo
November 2020
amazing stuff. robert sent them to me too, but i didn’t notice the water in the tub. holy smokes…